ClinicMate Developer Guide
Acknowledgements
This project is based on the AddressBook-Level3 project created by the SE-EDU initiative.
This project also utilised CoPilot and ChatGPT to assist in the development and documentation process.
Jayne - I had ChatGPT's assistance for HelpCommand code, documentation and UI edits done by me.
Jia Hui - I used the assistance of Github CoPilot for most of my code. I also used the assistance of ChatGPT mainly for documentation, UI edits for my code.
Drustan - I had Github CoPilot's assistance for most of the code attributed to me. Including but not limited to functional code, test code, github workflow files, and documentation.
Charmaine - I had the assistance of ChatGPT for some of my functional code (other than AddNote Command which was referenced from the tutorial for Remark Command). I mainly had assistance for test code, documentation and UI edits done by me.
Setting up, getting started
Refer to the guide Setting up and getting started.
Design
lightbulb Useful Tip:
- The
.pumlfiles used to create diagrams in this document are in thedocs/diagramsfolder in our code repository. - Refer to the PlantUML Tutorial at se-edu/guides to learn how to create and edit diagrams.
Architecture
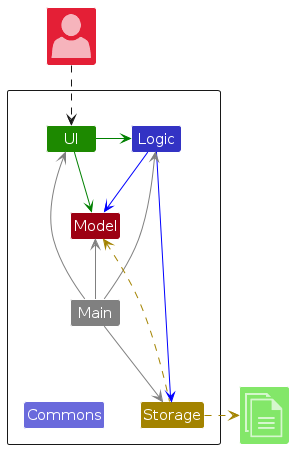
The Architecture Diagram given above explains the high-level design of the App.
Given below is a quick overview of main components and how they interact with each other.
Main components of the architecture
Main (consisting of classes Main and MainApp) is in charge of the app launch and shut down.
- At app launch, it initializes the other components in the correct sequence, and connects them up with each other.
- At shut down, it shuts down the other components and invokes cleanup methods where necessary.
The bulk of the app's work is done by the following four components:
UI: The UI of the App.Logic: The command executor.Model: Holds the data of the App in memory.Storage: Reads data from, and writes data to, the hard disk.
Commons represents a collection of classes used by multiple other components.
How the architecture components interact with each other
The Sequence Diagram below shows how the components interact with each other for the scenario where the user issues the command delete S0123456A.

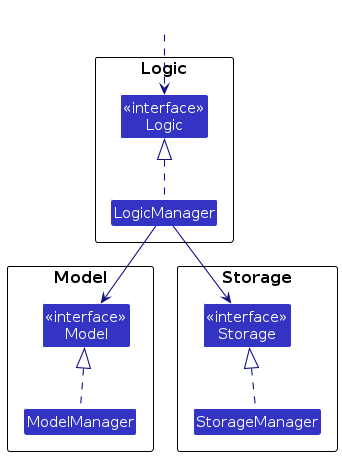
Each of the four main components (also shown in the diagram above),
- defines its API in an
interfacewith the same name as the Component. - implements its functionality using a concrete
{Component Name}Managerclass (which follows the corresponding APIinterfacementioned in the previous point.
For example, the Logic component defines its API in the Logic.java interface and implements its functionality using the LogicManager.java class which follows the Logic interface. Other components interact with a given component through its interface rather than the concrete class (reason: to prevent outside component's being coupled to the implementation of a component), as illustrated in the (partial) class diagram below.
The sections below give more details of each component.
UI component
The API of this component is specified in Ui.java
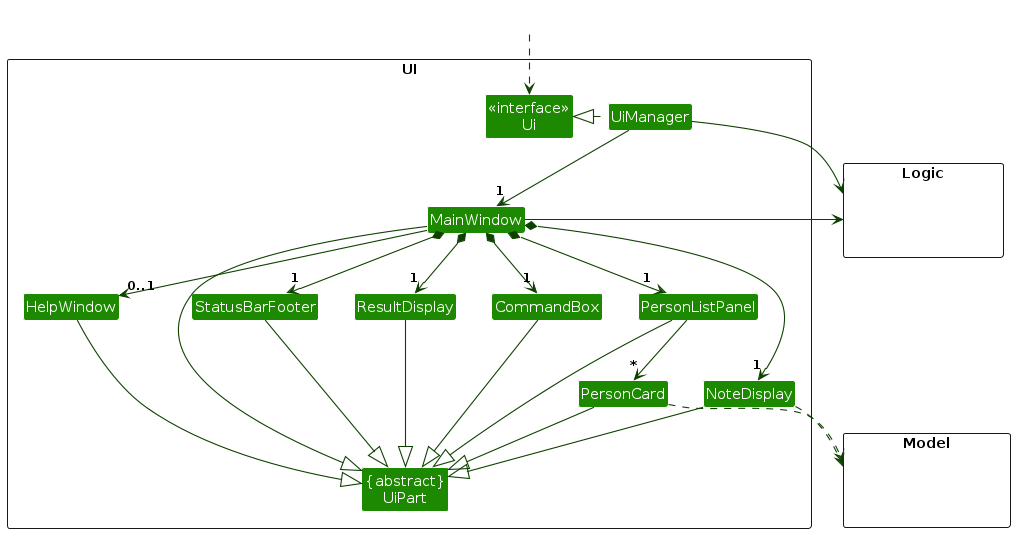
The UI consists of a MainWindow that is made up of parts e.g.CommandBox, ResultDisplay, PersonListPanel, StatusBarFooter etc. All these, including the MainWindow, inherit from the abstract UiPart class which captures the commonalities between classes that represent parts of the visible GUI.
The UI component uses the JavaFX UI framework. The layout of these UI parts are defined in matching .fxml files that are in the src/main/resources/view folder. For example, the layout of the MainWindow is specified in MainWindow.fxml
The UI component,
- executes user commands using the
Logiccomponent. - listens for changes to
Modeldata so that the UI can be updated with the modified data. - keeps a reference to the
Logiccomponent, because theUIrelies on theLogicto execute commands. - depends on some classes in the
Modelcomponent, as it displaysPersonobject residing in theModel.
Logic component
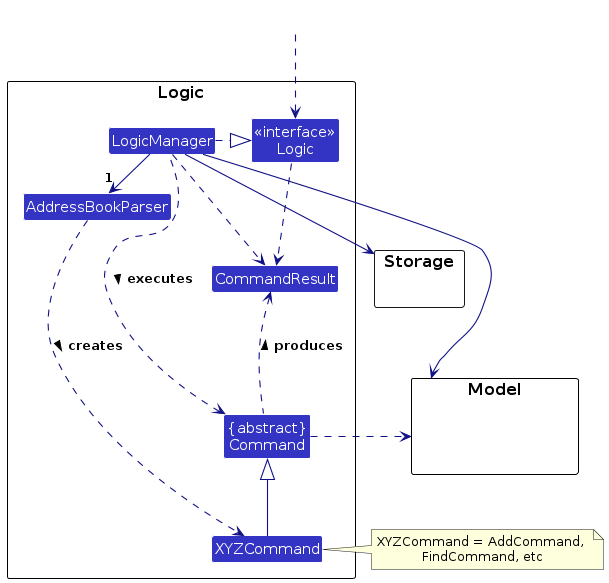
API : Logic.java
Here's a (partial) class diagram of the Logic component:
The sequence diagram below illustrates the interactions within the Logic component, taking execute("delete S0123456A") API call as an example.
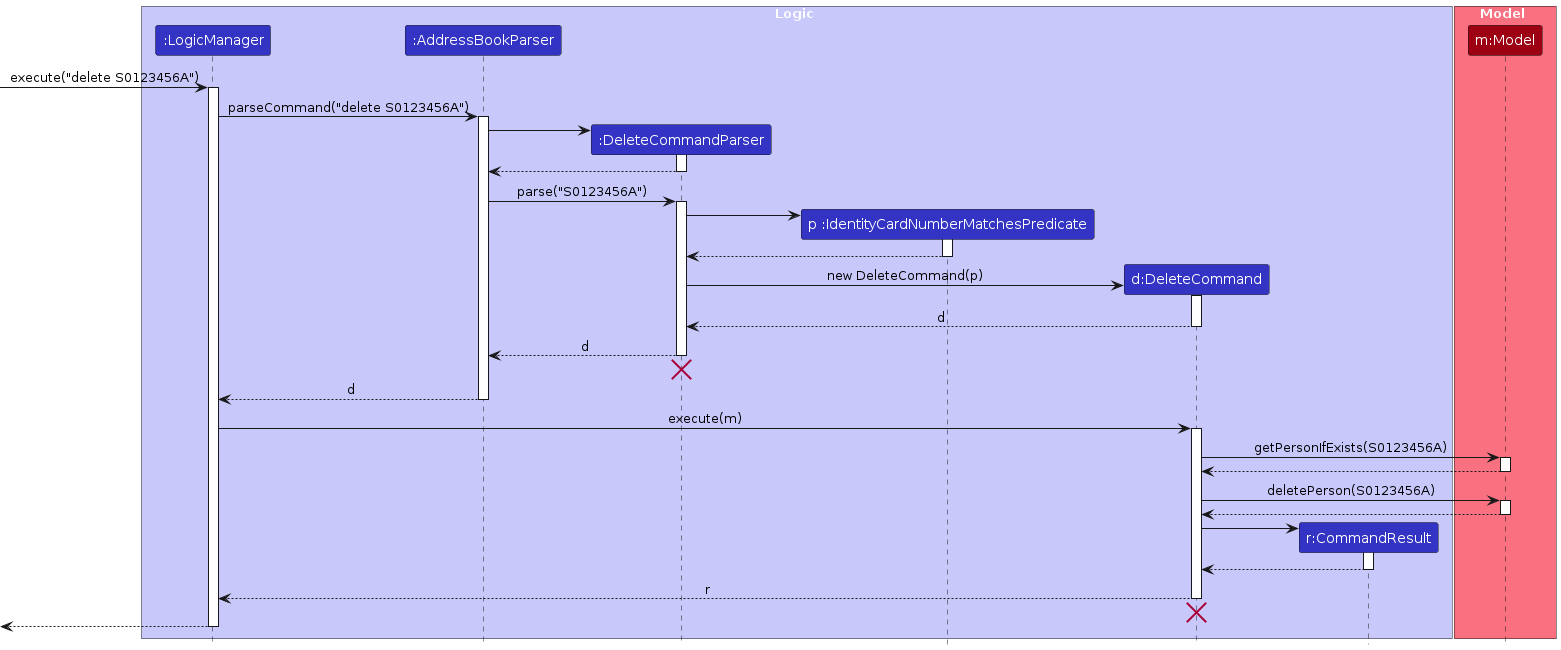
Note: The lifeline for DeleteCommandParser and DeleteCommand should end at the destroy marker (X) but due to a limitation of PlantUML, the lifeline continues till the end of diagram.
How the Logic component works:
- When
Logicis called upon to execute a command, it is passed to anAddressBookParserobject which in turn creates a parser that matches the command (e.g.,DeleteCommandParser) and uses it to parse the command. - This results in a
Commandobject (more precisely, an object of one of its subclasses e.g.,DeleteCommand) which is executed by theLogicManager. - The command can communicate with the
Modelwhen it is executed (e.g. to delete a person).
Note that the diagram above is simplified. In the code there might be more interactions (between the command object and theModel). - The result of the command execution is encapsulated as a
CommandResultobject which is returned back fromLogic.
Here are the other classes in Logic (omitted from the class diagram above) that are used for parsing a user command:
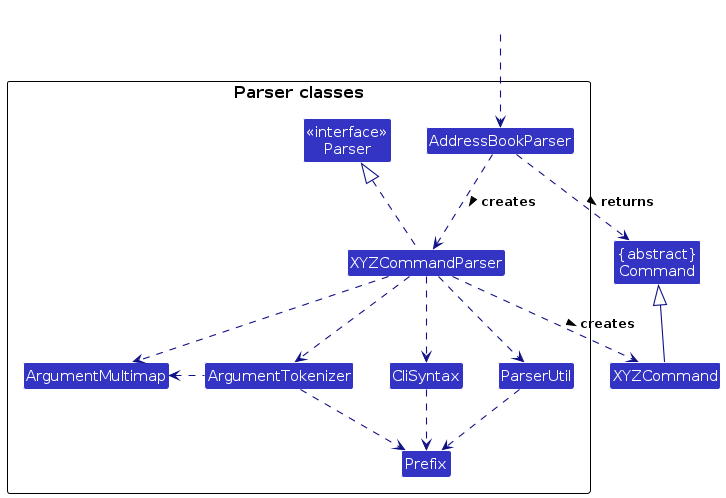
How the parsing works:
- When called upon to parse a user command, the
AddressBookParserclass creates anXYZCommandParser(XYZis a placeholder for the specific command name e.g.,AddCommandParser) which uses the other classes shown above to parse the user command and create aXYZCommandobject (e.g.,AddCommand) which theAddressBookParserreturns back as aCommandobject. - All
XYZCommandParserclasses (e.g.,AddCommandParser,DeleteCommandParser, ...) inherit from theParserinterface so that they can be treated similarly where possible e.g, during testing.
Model component
API : Model.java
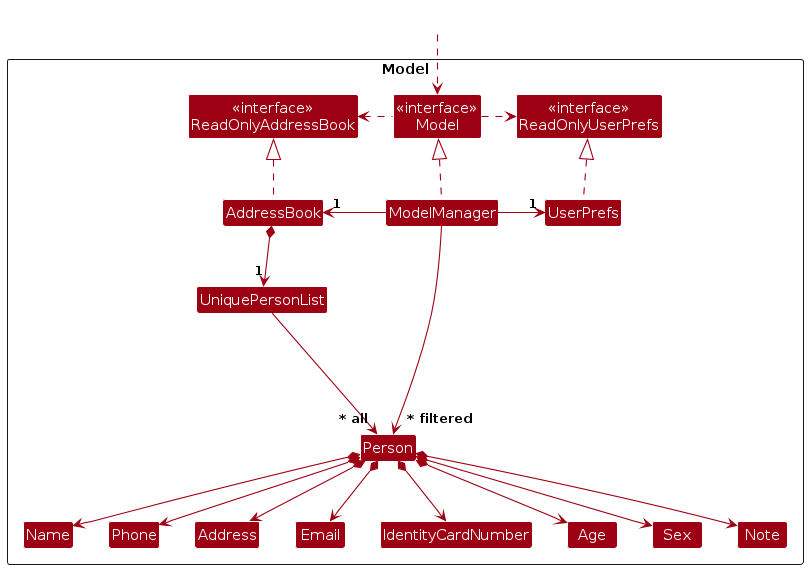
The Model component,
- stores the address book data i.e., all
Personobjects (which are contained in aUniquePersonListobject). - stores the currently 'selected'
Personobjects (e.g. results of a search query) as a separate filtered list which is exposed to outsiders as an unmodifiableObservableList<Person>that can be 'observed' e.g. the UI can be bound to this list so that the UI automatically updates when the data in the list changes. - stores a
UserPrefobject that represents the user’s preferences. This is exposed to the outside as aReadOnlyUserPrefobject. - does not depend on any of the other three components (as the
Modelrepresents data entities of the domain, they should make sense on their own without depending on other components).
Storage component
API : Storage.java
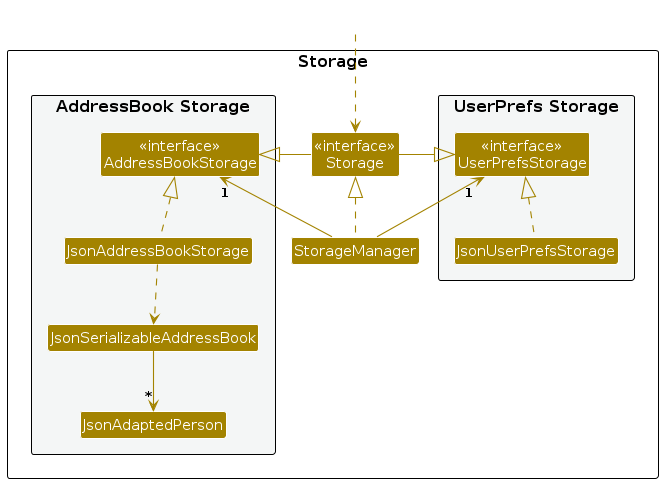
The Storage component,
- can save both address book data and user preference data in JSON format, and read them back into corresponding objects.
- inherits from both
AddressBookStorageandUserPrefStorage, which means it can be treated as either one (if only the functionality of only one is needed). - depends on some classes in the
Modelcomponent (because theStoragecomponent's job is to save/retrieve objects that belong to theModel).
Common classes
Classes used by multiple components are in the seedu.addressbook.commons package.
Implementation
This section describes some noteworthy details on how certain features are implemented.
Add feature
Implementation:
The add feature is implemented using the AddCommand class. The AddCommand object takes in a Person object.
Person object is created if the following conditions are satisfied:
- all the inputs for the parameters are valid
- all compulsory parameters are present
- no duplicate
Personin ClinicMate
The add mechanism is facilitated by AddressBook. It implements Model#addPerson(Person p)which allows users to add patients’ contacts
and relevant patient information into ClinicMate. These operations are exposed in the Model interface as Model#addPerson(Person p).
Apart from that, the feature also includes the following operation in Model, which implements the Model interface:
Model#hasPerson(Person person): Checks if thePersonto be added is already an existingPersonprofile in ClinicMate
Given below is an example usage scenario and how the add mechanism behaves at each step.
Step 1. The user launches the application for the first time. ClinicMate will be initialized with the initial address book state.
Step 2. The user executes add n\John Doe p\12345678 e\john@mail.com i\T0123456A ag\12 s\M a\John street, block 123, #01-01 to add the person in the address book with the unique IC number T0123456A.
The add command calls Model#addPerson(Person p), causing the modified state of the address book after the add n\John Doe … command executes to be saved.
Note: If a command fails its execution, it will not call Model#addPerson(Person p), so the address book state will not be saved.
The following sequence diagram illustrates how the add command works and goes through the Logic and Model components.
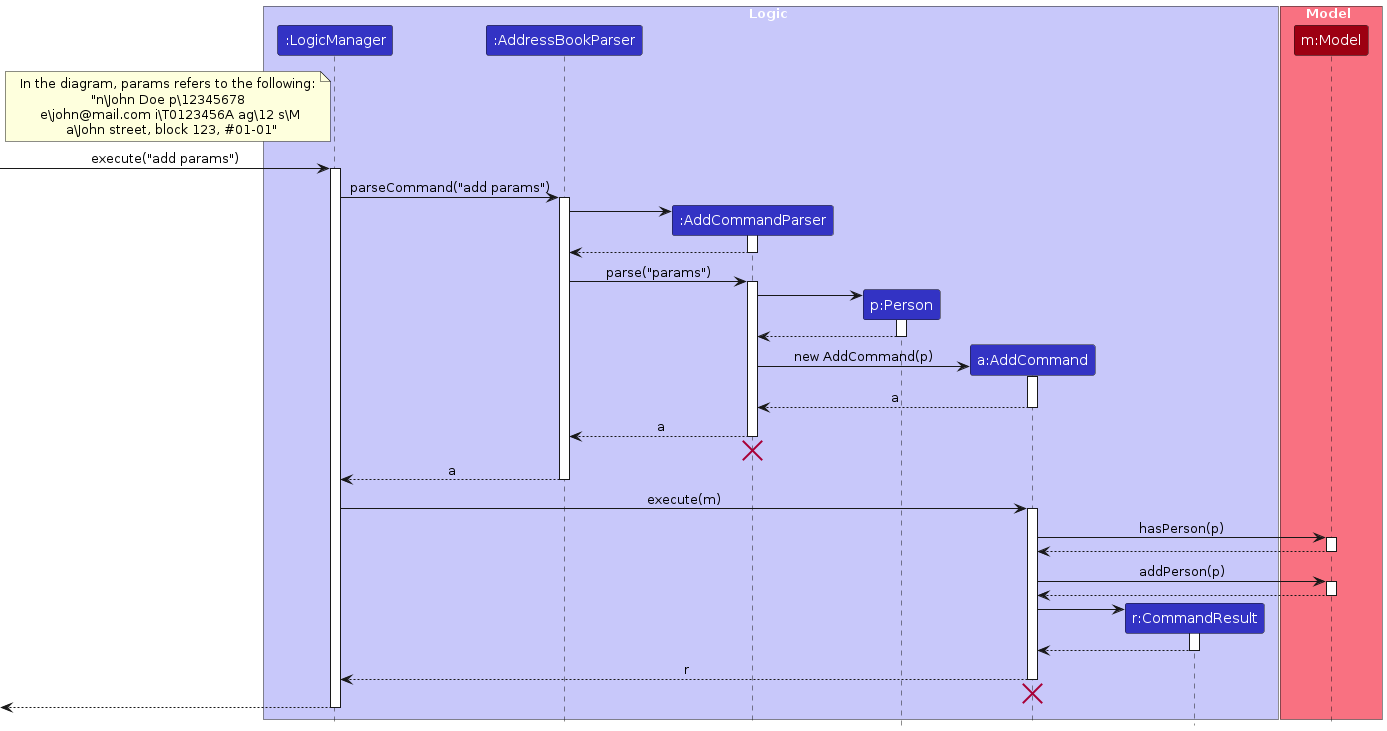
Note: The lifeline for AddCommandParser and AddCommand should end at the destroy marker (X) but due to a limitation of PlantUML, the lifeline reaches the end of diagram.
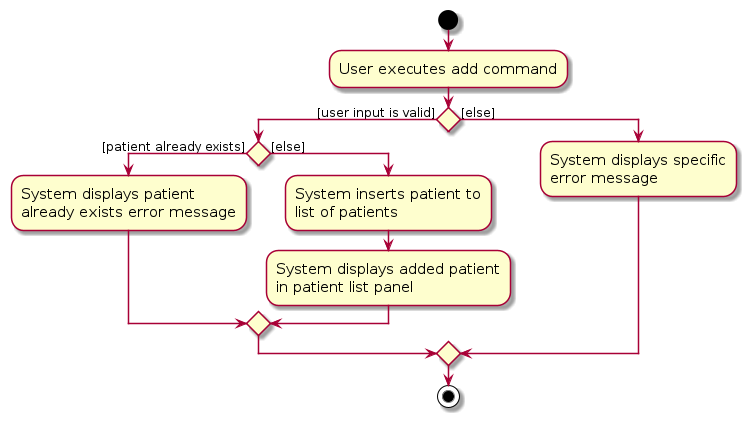
The following activity diagram summarizes what happens when a user executes a new add command:
Design Considerations & Alternatives Considered:
Aspect: How to add:
Alternative 1 (current choice): Requires all the relevant fields (e.g. name, phone, email, IC number, age, sex, address).
- Pros:
- Able to have complete contacts.
- For long time users: Do not need to use this command as often (mitigate cons that it is very long to type).
- Cons:
- For new users: May be difficult to remember all the fields required.
- For long time users: Command is very long to type.
- Pros:
Alternative 2: Allow users to add patients by adding fields as and when is needed (i.e. not make all the fields compulsory).
- Pros:
- Shorter command to type to add a patient.
- Cons:
- We must ensure that the implementation of each individual commands is correct.
- Might not have all the relevant information of patients. Messy to keep track.
- Pros:
Aspect: Display of new contact when command is successful:
- Current choice: Displays the new contact with relevant patient information in ClinicMate.
- Rationale: Users will be able to view the patient and the information added easily.
Aspect: Display of error message when command is unsuccessful:
- Current choice: Displays the correct error message based on the type of error made (e.g. missing fields, duplicate person, invalid IC number format).
- Rationale: Users will be able to learn of their error quickly and have an idea of what to edit to make the command successful.
Add/replace note feature
Implementation
The addnote mechanism is facilitated by AddressBook. It implements AddressBook#setPerson(Person target, Person editedPerson) which allow users to add/replace patients’ notes in the addressbook.
These operations are exposed in the Model interface:
Model#getPersonIfExists: Checks if thePersonwith the predicate existsModel#setPerson: Changes the note parameter of the targetPersonModel#isPersonDisplayed: Checks if thePersonhas their notes displayed in the patient notes panelModel#setDisplayedNote: IfModel#isPersonDisplayedreturns true, the notes displayed will be updated
Given below is an example usage scenario and how the addnote mechanism behaves at each step.
Step 1. The user launches the application. The AddressBook will be initialized with the initial address book state.
Step 2. The user executes addnote T0123456A n\Covid to add a note to the person in ClinicMate with the unique IC number T0123456A.
The addnote command calls Model#setPerson(Person target, Person editedPerson), causing the modified state of ClinicMate after the addnote T0123456A n\Covid command executes to be saved.
Note: If a command fails its execution, it will not call Model#setPerson(Person target, Person editedPerson), so the address book state will not be saved.
The following sequence diagram shows how an addnote operation goes through the Logic component:
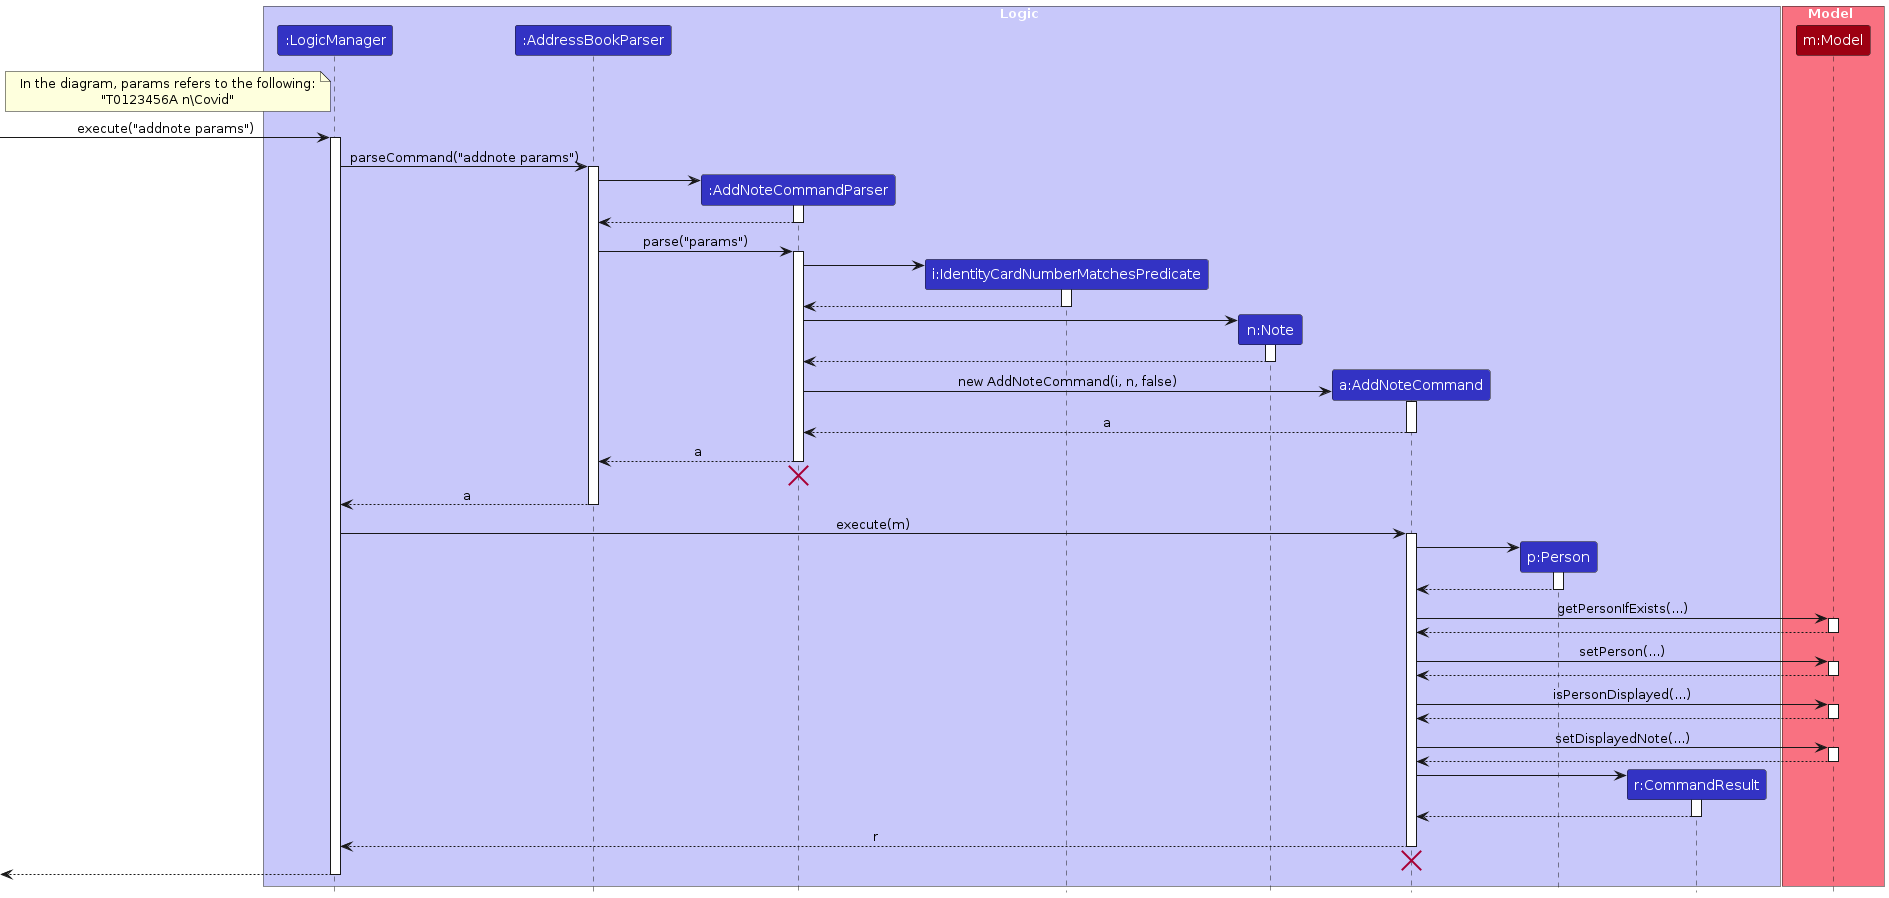
Note: The lifeline for AddNoteCommandParser and AddNoteCommand should end at the destroy marker (X) but due to a limitation of PlantUML, the lifeline reaches the end of diagram.
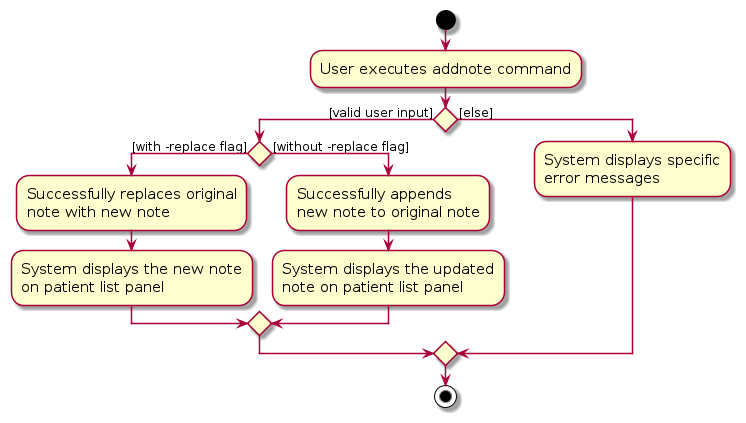
The following activity diagram summarizes what happens when a user executes a new addnote command:
Design Considerations & Alternatives Considered
Aspect: How to add or replace:
Alternative 1 (Current Choice): Have a flag (-replace) to allow users to replace the whole note section of specified patient.
This is an extension of the normal
addnotecommand where new notes are appended to the existing note itself.- Pros:
- Able to edit/clean up notes section.
- Gives users the freedom to decide how they want to keep notes.
- Cons:
- Users might not want to replace all the notes they have, and might just want to edit a section.
- Pros:
Alternative 2: Allow users to only add notes to patients.
- Pros: More structured command to add notes to patient.
- Cons: Not able to give users the freedom to ‘edit’ the notes they have.
Aspect: Display of new note when command is successful:
- Current choice: Displays the new note in the correct patient’s section in ClinicMate.
- Rationale: Users will be able to view the new note added easily.
Aspect: Display of error message when command is unsuccessful:
- Current choice: Displays the correct error message based on the type of error made (e.g. missing fields, invalid IC number format).
- Rationale: Users will be able to learn of their error quickly and have an idea of what to edit to make the command successful.
Find feature
Implementation
The find mechanism is facilitated by ModelManager. It implements ModelManager#updateFilteredPersonList(Predicate predicate)
which allow users to find patients in ClinicMate.
These operations are exposed in the Model interface as Model#updateFilteredPersonList(Predicate predicate).
The predicate argument takes in a IdentityCardNumberMatchesPredicate to filter the list of patients.
Given below is an example usage scenario and how the find mechanism behaves at each step.
Step 1. The user launches the application. The AddressBook will be initialized with the initial address book state.
Step 2. The user executes find S0123456A to find the person in the address book with the unique IC number S0123456A. The find command calls Model#updateFilteredPersonList(Predicate predicate),
causing the modified state of the address book after the find S0123456A command executes to be displayed.
Note: If a command fails its execution, it will not call Model#updateFilteredPersonList(Predicate predicate), so the address book state will not be displayed.
The following sequence diagram shows how a find operation goes through the Logic component:
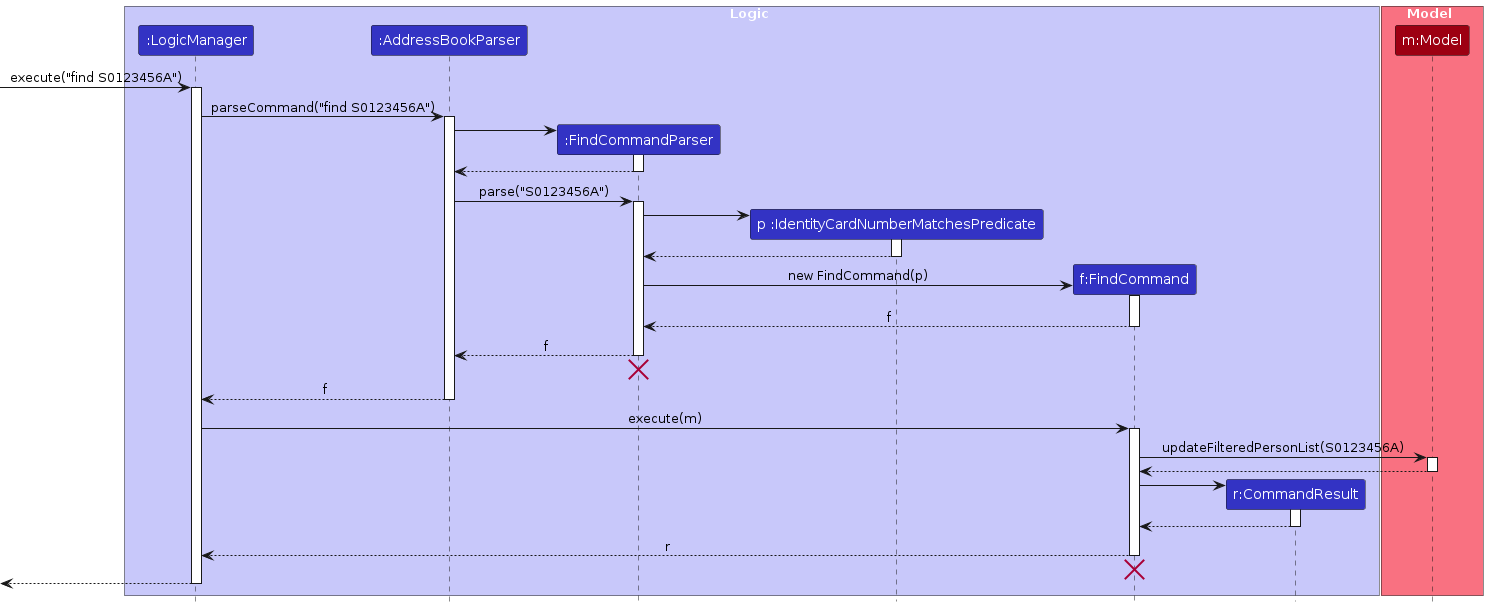
Note: The lifeline for FindCommand and FindCommandParser should end at the destroy marker (X) but due to a limitation of PlantUML, the lifeline reaches the end of diagram.
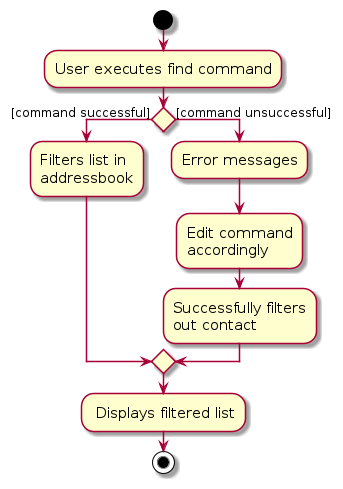
The following activity diagram summarizes what happens when a user executes a new command:
Design Considerations & Alternatives Considered
Aspect: Filtering patients
Alternative 1 (Current Choice): Requires users to input a full and valid IC number
- Pros: Precise results, allows users to directly single out the patient's details
- Cons: Might omit relevant results if the user types the IC number incorrectly
Alternative 2: Match all relevant patients' profiles even if the user enters a partial IC number
- Pros: Flexible search, more time-efficient, returns results even without typing the whole IC number
- Cons: Might produce more results than expected. Might incorrectly refer to the wrong patient details.
Aspect: Display of filtered list when command is successful:
- Current choice: Displays the correct patient’s contact in the patient list panel.
- Rationale: Users will be able to view the contact added easily.
Aspect: Display of error message when command is unsuccessful:
- Current choice: Displays the correct error message based on the type of error made (e.g. missing fields, invalid IC number format).
- Rationale: Users will be able to learn of their error quickly and have an idea of what to edit to make the command successful.
Delete feature
Implementation
The delete mechanism is facilitated by Addressbook. It implements Addressbook#removePerson(Person key) which allow users to delete patients in the addressbook.
These operations are exposed in the Model interface as Model#getPersonIfExists(Predicate predicate) and Model#deletePerson(Person target).
Given below is an example usage scenario and how the delete mechanism behaves at each step.
Step 1. The user launches the application. The AddressBook will be initialized with the initial address book state.
Step 2. The user executes delete S0123456A to delete the person in the address book with the unique IC number S0123456A.
The delete command calls Model#deletePerson(Person target), causing the modified state of the address book after the delete S0123456A command executes to be saved.
Note: If a command fails its execution, it will not call Model#deletePerson(Person target), so the address book state will not be saved.
The following sequence diagram shows how a delete operation goes through the Logic component:
Note: The lifeline for DeleteCommandParser and DeleteCommand should end at the destroy marker (X) but due to a limitation of PlantUML, the lifeline reaches the end of diagram.
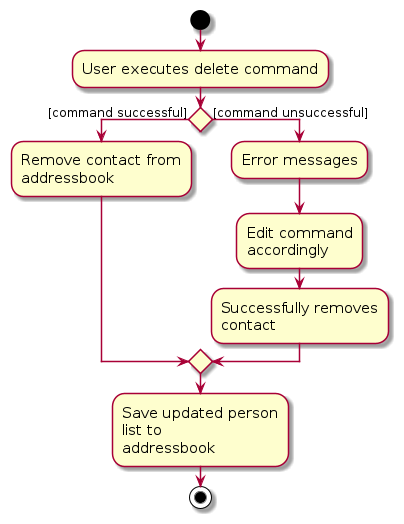
The following activity diagram summarizes what happens when a user executes a new command:
Design Considerations & Alternatives Considered
Aspect: Display of updated person list when command is successful:
- Current choice: Displays the updated patient list in the addressbook without the deleted entry.
- Rationale: Users will be able to view the updated contact list easily.
Aspect: Display of error message when command is unsuccessful:
- Current choice: Displays the correct error message based on the type of error made (e.g. missing fields, invalid IC number format).
- Rationale: Users will be able to learn of their error quickly and have an idea of what to edit to make the command successful.
Edit feature
Implementation
The edit mechanism is facilitated by AddressBook. It implements AddressBook#setPerson(Person target, Person editedPerson) which allow users to edit patient’s details in the addressbook.
These operations are exposed in the Model interface as Model#setPerson(Person target, Person editedPerson).
The edit feature has the following operations in ModelManager which implements the Model interface:
Model#getPersonIfExists(predicate): Returns the specifiedPersonif they exist in the list.Model#setPerson: Replaces the givenPersontarget witheditedPerson. Target must exist in the address book. The identity ofeditedPersonmust not be the same as another existing person in the address book.Model#hasPerson: Returns true if the address book contains the person in question.Model#updateFilteredPersonList: Updates the filter of the filtered person list to filter by the given predicate.
Given below is an example usage scenario and how the edit mechanism behaves at each step.
Step 1. The user launches the application. The AddressBook will be initialized with the initial address book state.
Step 2. The user executes edit T0123456A … to edit details of the person in the address book with the unique IC number T0123456A. The edit command calls Model#setPerson(Person target, Person editedPerson), causing the modified state of the address book after the edit T0123456A … command executes to be saved.
Note: If a command fails its execution, it will not call Model#setPerson(Person target, Person editedPerson), so the address book state will not be saved.
The following sequence diagram shows how an edit operation goes through the Logic component:
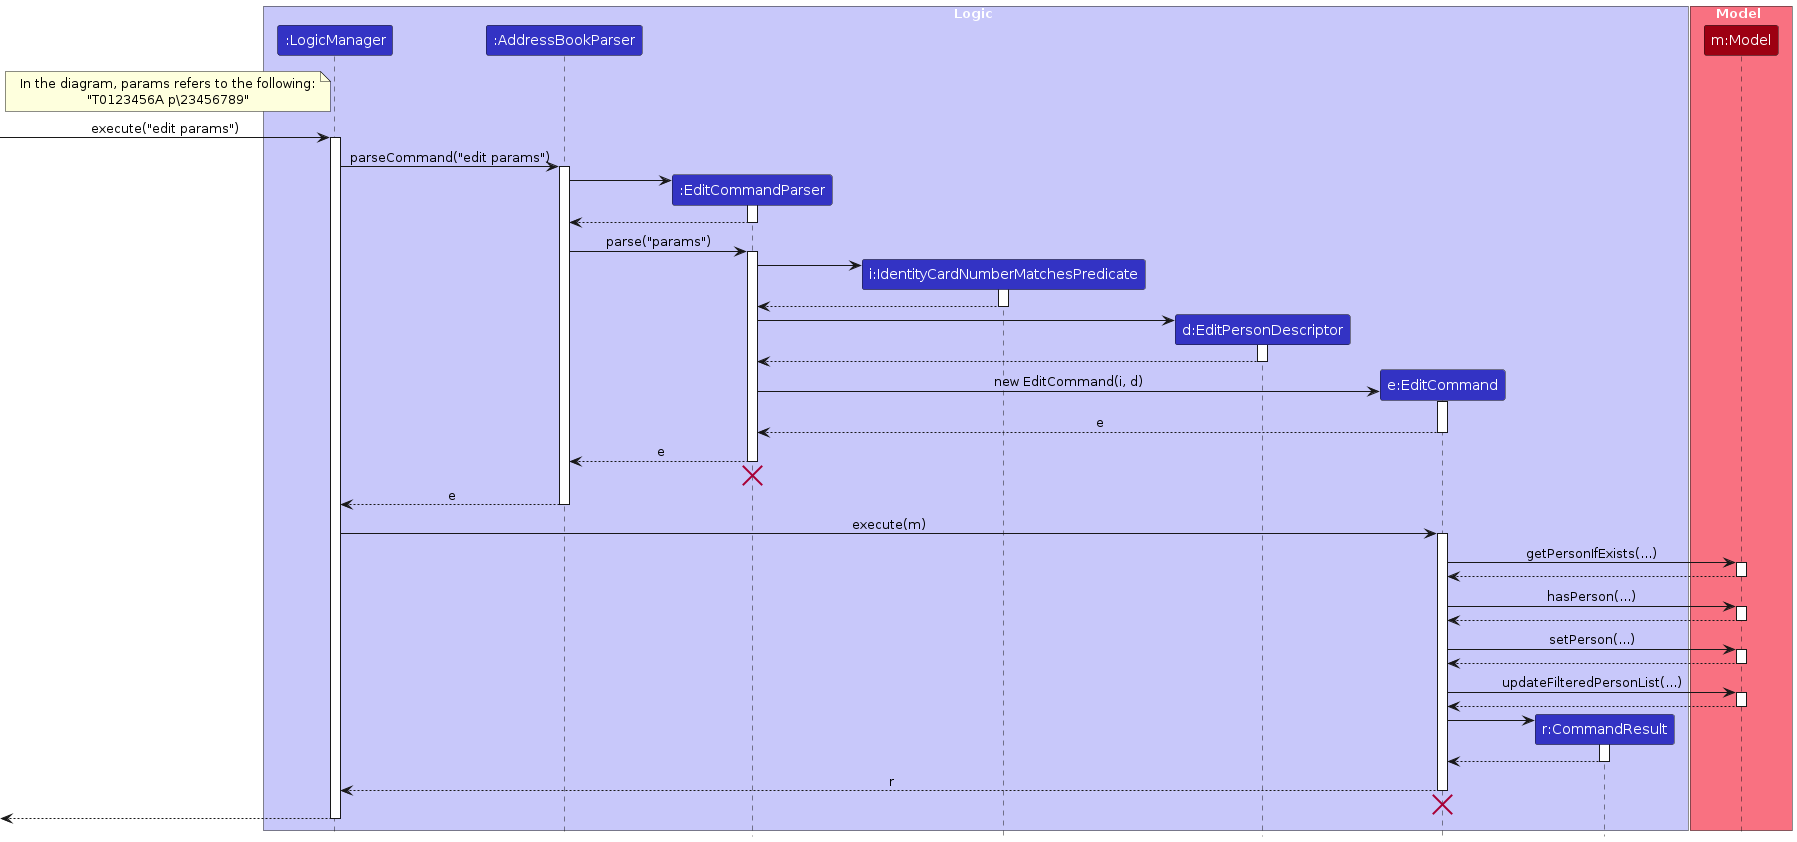
Note: The lifeline for EditCommand and EditCommandParser should end at the destroy marker (X) but due to a limitation of PlantUML, the lifeline reaches the end of diagram.
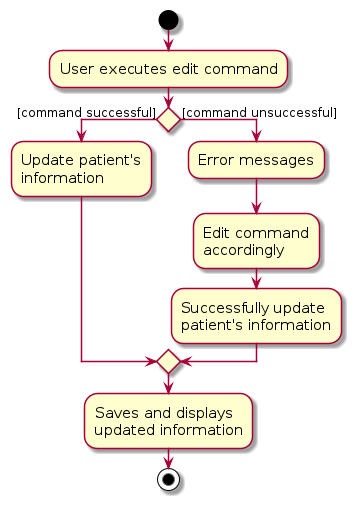
The following activity diagram summarizes what happens when a user executes a new command:
Design Considerations & Alternatives Considered
Aspect: Display of updated information when command is successful:
- Current choice: Displays the updated information in the correct patient’s section in the addressbook.
- Rationale: Users will be able to view the updated information easily.
Aspect: Display of error message when command is unsuccessful:
- Current choice: Displays the correct error message based on the type of error made (e.g. missing fields, invalid ic format).
- Rationale: Users will be able to learn of their error quickly and have an idea of what to edit to make the command successful.
Show feature
Implementation
The show mechanism is facilitated by ModelManager. It implements
ModelManager#getPersonIfExists(predicate): Returns the specifiedPersonif they exist in the list.ModelManager#setDisplayNote(Person person): Which allows users to display the notes of selected contacts on theNoteDisplay.ModelManager#clear(): Which clears the notes inNoteDislay.
The ShowCommandParser parses the user input and implements ShowCommand#createClearCommand() if input is an empty string, else,
it implements ShowCommand#createShowCommad(IdentityCardNumberMatchesPredicate icPredicate).
Given below is an example usage scenario and how the show mechanism behaves at each step.
Step 1: The user launches the application. The AddressBook will be initialized with the initial address book state.
Step 2:
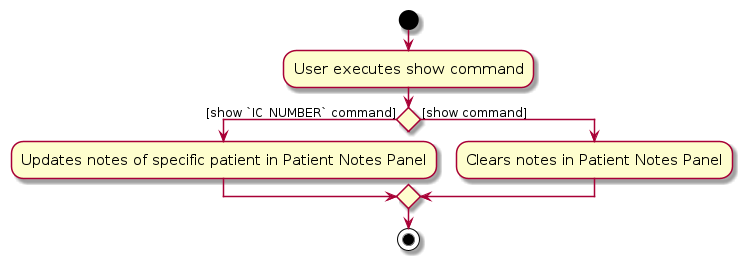
Scenario 1: The user executes
show T0123456A ...to show the notes of the person in the address book with the unique IC number ofT0123456A. Theshowcommand callsModelManager#getPersonIfExists(predicate)to check if the specific person exists in the addressbook.ModelManager#setDisplayNote(Person person)is then called, causing the modified state of the address book after theshow T0123456A ...command executes to be displayed.Scenario 2: The user executes
showto clear the notes of the person in patient notes panel of the address book. Theshowcommand callsModelManager#clear(), causing the modified state of the address book after theshowcommand executes to be displayed.
The following sequence diagram illustrates how a show operation goes through the Logic component and sets the patient notes panel.
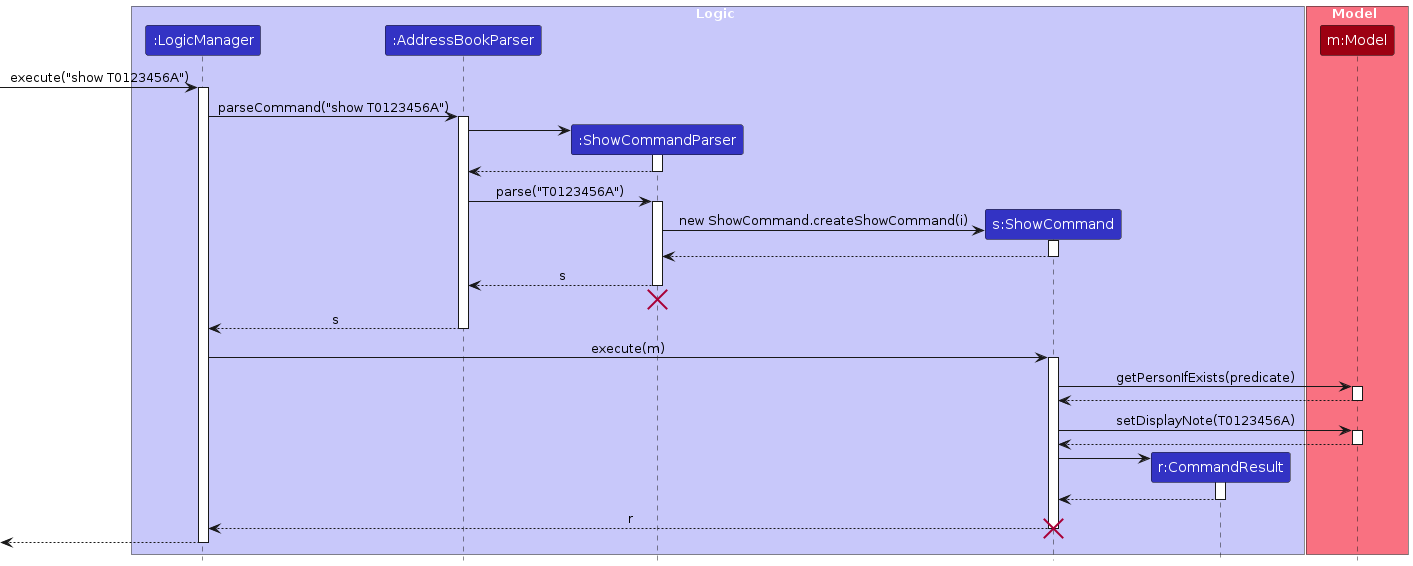
Note: The lifeline for ShowCommandParser and ShowCommand should end at the destroy marker (X) but due to a limitation of PlantUML, the lifeline reaches the end of diagram.
The following activity diagram summarizes what happens when a user executes a show command:
Design Considerations & Alternatives Considered
Aspect: How to show the notes of patient on patient notes panel.
Alternative 1 (Current Choice): Show patient's notes in one command using
IC_NUMBER.Pros: Users are able to view specific user's notes.
Cons: Only allow for one parameter which is
IC_NUMBER.
Alternative 2: Only show the patient notes which was last searched for.
Pros: Easy to implement.
Cons: Brings inconvenience to users if they only want to view a specific user's notes.
Aspect: How to clear the notes of patient on patient notes display.
Alternative 1 (Current Choice): Clears patient's notes on patient notes display using one command.
Pros: Easy to implement. Users do not need to remember so many commands.
Cons: The command might not be intuitive.
Alternative 2: Clears patient's notes on patient notes display with another command.
Pros: The command is more intuitive.
Cons: Users are required to know an extra command, which reduces usability of application.
NoteDisplay (UI Component)
The NoteDisplay allows the users to view the notes of the selected patient in the patient list. All notes are displayed in the Person Card.
Implementation
NoteDisplay inherits UIPart and is used to display the notes section of the patient details. More details of the class implementation can be seen in the class diagram below.
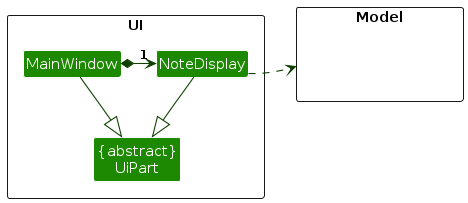
NoteDisplay has a private field noteDisplay which is of type TextArea. The NoteDisplay has a method called setNoteToUser which takes in a Note and changes the noteDisplay through its settext method.
The notes will then be displayed in a section which is a FXML VBox.
Design Consideration & Alternatives Considered
Aspect: How the notes of the patient are displayed
Alternative 1 (Current Choice): Display the notes of the patients in a separate panel.
Pros: The information of patient is more well organised. It allows users to have a more comprehensive view of their patient notes.
Cons: One additional command is needed to view the notes of the patients.
Alternative 2: Display the notes of the patients in the
PersonCardwith the rest of the details.Pros: The user does not need to enter an extra command to view the notes of the patients.
Cons: It is very difficult to view the notes of the individual patient as there is too much information displayed on the
PersonCard.
Documentation, logging, testing, configuration, dev-ops
Appendix A: Requirements
Product scope
Target user profile:
- General Practitioners working in their own private GP Clinics
- short staffed with minimal assistants for administrative tasks
- annoyed by relying on pen and paper to track patient contacts
- can type fast
- prefer desktop apps over other types
- prefers typing to mouse interactions
- is reasonably comfortable using CLI apps
Value proposition: Quick and easy management of patient contacts, including important patient information.
User stories
Priorities: High (must have) - * * *, Medium (nice to have) - * *, Low (unlikely to have) - *
| Priority | As a … | I want to … | So that I can… |
|---|---|---|---|
* * * | user | add a new patient | manage patient information for that new patient |
* * * | organised user | easily delete unnecessary data to reduce clutter in ClinicMate | maintain a clean and organised patient database |
* * * | user | add notes associated to each patient (including past diagnosis etc.) | easily follow up on necessary actions and understand the patient better |
* * * | user | exit ClinicMate quickly | conclude my session at the end of the day and ensure that ClinicMate is not running in the background |
* * | user | remove notes associated to each patient | remove irrelevant information and keep my notes up to date |
* * | user managing many patients | filter the data based on ic number | view the information quickly without searching through the whole list |
* * | careless user | edit patient information | keep accurate records of my patients |
* * | new user | see usage instructions | refer to instructions when I have difficulty using ClinicMate |
* * | new user | clear all sample data | insert my own patient information into ClinicMate |
* * | new user | see ClinicMate populated with sample data | see how ClinicMate looks like when it is in use |
* | user | show individual patient information | focus on the patient's details during consultations |
* | creative user | be able to change the theme of ClinicMate | personalise the apperance of the user interface based on my preferences |
* | new user | be able to export patient data | analyse health trends of a patient over time |
Use cases
edit Note:
For all use cases below, the System is the ClinicMate and the Actor is the user, unless specified otherwise
Use case: UC01 - Add a person
MSS
User requests to list patients.
ClinicMate shows a list of patients.
User requests to add a specific patient to the list.
ClinicMate adds the patient.
Use case ends.
Extensions
2a. The list is empty.
Use case ends.
3a. The given command format is wrong.
3a1. ClinicMate shows an error message.
Use case resumes at step 2.
4a. There is an existing user in the database.
4a1. ClinicMate shows an error message.
Use case resumes at step 2.
Use case: UC02 - Add notes for a person
MSS
User requests to list patients.
ClinicMate shows a list of patients.
User requests to add notes for a specific patient in the list.
ClinicMate adds notes for the patient.
Use case ends.
Extensions
2a. The list is empty.
Use case ends.
3a. The given command format is wrong → handled similarly to UC01 3a.
4a. The given
IC_NUMBERis invalid.4a1. ClinicMate shows an error message.
Use case resumes at step 2.
Use case: UC03 - Delete a person
MSS
User requests to list patients.
ClinicMate shows a list of patients.
User requests to delete a specific patient in the list.
ClinicMate deletes the patient.
Use case ends.
Extensions
2a. The list is empty.
Use case ends.
3a. The given command format is wrong → handled similarly to UC01 3a.
4a. The given
IC_NUMBERis invalid → handled similarly to UC02 4a.
Use case: UC04 - Find a person
MSS
User requests to list patients.
ClinicMate shows a list of patients.
User requests to find a specific patient in the list.
ClinicMate finds the patient.
Use case ends.
Extensions
2a. The list is empty.
Use case ends.
3a. The given command format is wrong → handled similarly to UC01 3a.
4a. The given
IC_NUMBERis invalid → handled similarly to UC02 4a.
Use case: UC05 - Edit a person
MSS
User requests to list patients.
ClinicMate shows a list of patients.
User requests to edit a specific patient in the list.
ClinicMate edits the patient.
Use case ends.
Extensions
2a. The list is empty.
Use case ends.
3a. The given command format is wrong → handled similarly to UC01 3a.
4a. The given
IC_NUMBERis invalid → handled similarly to UC02 4a.
Use case: UC06 - Show a person
MSS
User requests to list patients.
ClinicMate shows a list of patients.
User requests to show a specific patient in the list.
ClinicMate shows the patient.
Use case ends.
Extensions
2a. The list is empty.
Use case ends.
3a. The given command format is wrong → handled similarly to UC01 3a.
4a. The given
IC_NUMBERis invalid → handled similarly to UC02 4a.
Use case: UC07 - Clear all patients
MSS
User requests to list patients.
ClinicMate shows a list of patients.
User requests to clear all patients from the full list of patients.
ClinicMate clear all patients in the list.
Use case ends.
Extensions
2a. The list is empty.
Use case ends.
3a. The given command format is wrong → handled similarly to UC01 3a.
Use case: UC08 - Exit the program
MSS
User requests to exit the program.
ClinicMate exits.
Use case ends.
Extensions
- 1a. The given command format is wrong → handled similarly to UC01 3a.
Use case: UC09 - View help
MSS
User requests for help to use ClinicMate.
ClinicMate shows a help window with a link to the user guide.
Use case ends.
Extensions
- 1a. The given command format is wrong → handled similarly to UC01 3a.
Non-Functional Requirements
- Should work on any mainstream OS as long as it has Java
11or above installed. - A user with above average typing speed for regular English text (i.e. not code, not system admin commands) should be able to accomplish most of the tasks faster using commands than using the mouse.
- Should be able to hold up to 1000 persons without a noticeable sluggishness in performance for typical usage.
- Should respond to user actions within 5 seconds under normal load conditions.
- Should be designed to use system resources (e.g. CPU) efficiently to minimise its impact on the host environment.
- User interface should be intuitive and easy for users with varying levels of technical expertise.
- Codebase should be well-documented and follow best practices to facilitate future maintenance and enhancements.
- Should be easy for developers to add new features or make changes to existing ones without causing unintended side effects.
- Should comply with relevant data privacy regulations (e.g. PDPA) and ensure user data is stored and processed securely.
- Should be able to be used alongside other systems and services commonly used in healthcare settings, such as electronic health record (EHR) systems.
Glossary
edit Note:
Some definitions have been omitted as they have already been defined in the user guide.
- Mainstream OS: Windows, Linux, MacOS
- GP: General Practitioner, a general physician who provides primary care (usually in a clinic).
- Taking History: A medical term for recording a patient's symptoms, medical history, and other relevant information.
- IC Number: Short for NRIC (National Registration Identity Card) Number, a unique identifier for Singapore citizens and permanent residents.
- JavaFX: The User Interface framework used in this project.
- PlantUML: The tool used to make diagrams in this guide.
- System: Refers to ClinicMate.
- Patient list panel: Refers to the list of patient contacts displayed on the left hand side of the screen in ClinicMate.
- Patient notes panel: Refers to the notes section displayed on the right hand side of the screen in ClinicMate.
Appendix B: Planned Enhancements
Customisable fields
Potential Issues With Current Feature
Existing Person class has all fields: name, age, sex, ic, phone, email and address. However, users might not require all of these fields.
User A might not require the phone field while User B might require all fields, including those that ClinicMate has yet to implement.
Hence, it is important that ClinicMate allows for users to customize the fields they require to make it less restrictive and allow for flexibility.
Proposed Enhancements
Before users initialize their own version of ClinicMate, they will be able to choose the fields from a whole range of fields which we offer. The fields could also be made optional depending on user's choice. Their application will thus be initialized with user's very own fields which they require.
Examples
- User A could have the
Personclass with onlyname,age,sex, andic. - User B could have the
Personclass with onlyname,age,sex,icandphonewith thephonefield optional. add n\John Doe p\12345678 i\T0123456A ag\12 s\M a\311, Clementi Ave 2, #02-25will be allowed.add n\John Doe e\johndoe@mail.com i\T0123456A ag\12 s\M a\311, Clementi Ave 2, #02-25will be allowed.add n\John Doe i\T0123456A ag\12 s\M a\311, Clementi Ave 2, #02-25will be allowed.
Flexible find command
Potential Issues With Current Feature
Currently, the find command only allows users to find patient details using their IC_NUMBER. This could be inconvenient and troublesome
at times as users are required to type out the full IC_NUMBER. A single wrong character thus requires the user to re-look at the whole string of
IC_NUMBER again in order to identify their mistakes.
Proposed Enhancements
In light of this issue, we would be working on our application to provide an update to the find command
to allow users to find contacts using different fields such as name, age, email etc. They will be case-insensitive to allow for better search results.
Examples
- find
Johnreturns contact withnameofJohn Doeand correspondingIC_NUMBERofT0123456A - find
johndoe@mail.comreturns contact withemailofjohndoe@mail.comand correspondingIC_NUMBERofT0123456A
Update notes window during execution of commands
Potential Issues With Current Feature
Users have given us the feedback that the notes in our patient notes panel does not update with the use of other commands.
For instance, if our notes panel currently already has John's notes reflected on it, using the addnote command to add a note of another contact who is not John will not cause the
notes panel to update accordingly. John's notes will still exist on the notes panel despite executing the addnote command to edit the note of another person.
This could bring inconvenience to the user as users will not be able to view a contact's notes immediately upon using other commands.
They would then have to go through the hassle of typing the show command to allow the new contact's note to be displayed on the notes panel.
Proposed Enhancements
In order to make it more convenient for the users, we will enhance all of our commands such that the notes of the contact involved in the last executed command will have his/her notes replace the current notes in the notes panel. We will also allow users to know whose note they are viewing, by displaying the patient's name or IC number.
Examples
- If the notes panel is currently displaying the notes of the user with
IC_NUMBERofT1234567C, executingaddnote T0123456A n\diabetes, will cause the notes panel to update to the notes of user withIC_NUMBERofT0123456A - If the notes panel is currently displaying the notes of the user with
IC_NUMBERofT1234567C, executingedit T0123456A p\12345678, will cause the notes panel to update to the notes of user withIC_NUMBERofT0123456A
Support more languages
Potential Issues With Current Feature
Currently, ClinicMate only supports English and does not support other languages such as Chinese, Japanese, Arabic etc. This restricts the usability of
users who does not use English. In another scenario where a patient's name might not be in English, the user will also not be able to perform most commands such as add, edit etc.
Proposed Enhancements
We will be allowing more languages to be supported in ClinicMate
Examples
add n\ジョン p\12345678 e\johndoe@mail.com i\T0123456A ag\12 s\M a\311, Clementi Ave 2, #02-25will be allowed.edit n\ジョン p\12345678will be allowed.
Improving error handling specificity for user-facing commands
Potential Issues With Current Feature
While most of the error messages are specific, there are some instances where the error messages are too general. For instance,
currently, the edit command does not check the existence of IC_NUMBER upon entering an edit command with an empty field.
For instance, entering edit S1234567P in the event that the contact with the IC_NUMBER of S1234567P does not exist returns an error message
of at least one field to edit must be provided. However, the error message should be that the IC_NUMBER provided does
not exist as the existence of the IC_NUMBER should be checked first. This is a problem as users might go on to provide a field for a non-existing contact, thus returning them another error message.
Proposed Enhancements
We will add more specific conditionals to verify the validity of parsed inputs in the various Parser classes.
Examples
edit S1234567Pshould return the error message theIC_NUMBERprovided does not exist.edit S1234567P e\should return the error message email field should not be blank.
Allowing for multiple phone numbers
Potential Issues With Current Feature
Currently, our phone number field only allows for one number. However, since ClinicMate is targeted at doctors working at the GP clinics with their contacts being patients, it
is only natural for the phone number field to allow for multiple numbers. Reason being that a patient might have a caregiver or is required to contact his/her
family members. Therefore, restricting the phone to only one is very restrictive and could bring about inconvenience.
Proposed Enhancements
We will allow for the addition of multiple numbers under the phone field through the add command.
Examples
add n\John Doe p\12345678 e\johndoe@mail.com i\T0123456A ag\12 s\M a\311, Clementi Ave 2, #02-25will cause thephonenumber12345678to be added for userT0123456Aadd n\John Doe p\12345678, 09876544, 99999999 e\johndoe@mail.com i\T0123456A ag\12 s\M a\311, Clementi Ave 2, #02-25will cause thephonenumbers12345678, 09876544, 99999999to be added for userT0123456A
Allowing for derivation of age through Date-Of-Birth
Potential Issues With Current Feature
Existing features require the users to manually enter the age of contacts. For example, add n\John Doe p\12345678 e\johndoe@mail.com i\T0123456A ag\12 s\M a\311, Clementi Ave 2, #02-25.
However, it is very cumbersome for users to edit the age of their contact individually through the edit command.
Proposed Enhancements
In order to save the time of our users, we will be adding in a new field called DOB which is Date of Birth in the form of DD/MM/YYYY.
age of the contacts will thus be derived from their DOB with reference to the current year which we are in. Hence, streamlining the contact management process.
Examples
Given that we are in the year 2024, the patient with the DOB of
10/10/2003will be at the age of 2112/12/1990will be at the age of 34
Storing notes as a doubly linked list
Potential Issues With Current Feature
Firstly, our current addnote command only allows users to add a new note, which will be appended to the previous one. However,
there might be many instances in which the users need to edit or delete specific notes. Disallowing this will make adding notes quite frustrating at times.
Secondly, each of the contacts in the patient list panel has a notes section which cannot be hidden and will appear in the UI. Users might not want to see all the notes for each contact as it might be very long and distracting.
Lastly, there is a lack of organisation for the notes and users might want to categorize their notes into different sections.
Proposed Enhancements
Convert the way notes are stored to use a doubly linked list. This will allow for the independent updating and manipulation of separate notes, while still maintaining the chronological effect of notes being appended.
Examples
Since this is a work in progress, please do stay tuned for any updates to see how these could be implemented. We thank you for your patience.
Appendix C: Instructions for manual testing
Given below are instructions to test ClinicMate manually.
edit Note:
These instructions only provide a starting point for testers to work on;
testers are expected to do more exploratory testing.
Launch and shutdown
Initial launch
Download the jar file and copy into an empty folder.
Double-click the jar file.
Expected: Shows the GUI with a set of sample contacts. The window size may not be optimum.
Saving window preferences
Resize the window to an optimum size. Move the window to a different location. Close the window.
Re-launch the app by double-clicking the jar file.
Expected: The most recent window size and location is retained.
Adding a person
Adding a person while all persons are being shown
Prerequisites: List all persons using the
listcommand. Multiple persons will be shown in the list.Test case:
add n\John Doe p\12345678 e\JohnDoe@mail.com i\T0123456A ag\12 s\M a\311, Clementi Ave 2, #02-25
Expected: New contact with the unique IC numberT0123456Ais added to the list. Details of the new contact shown in the status message.Test case:
add T0123A
Expected: No person is added. Error details shown in the status message. Status bar remains the same.Other incorrect add commands to try:
add,add n\,...
Expected: Similar to previous.
Deleting a person
Deleting a person while all persons are being shown
Prerequisites: List all persons using the
listcommand. Multiple persons will be shown in the list.Test case:
delete T0123456A
Expected: The contact with the unique IC numberT0123456Ais deleted from the list. Details of the deleted contact shown in the status message.Test case:
delete T0123A
Expected: No person is deleted. Error details shown in the status message. Status bar remains the same.Other incorrect delete commands to try:
delete,delete x,...(where x is the IC number which does not exist in the list)
Expected: Similar to previous.
Adding note to a person
Adding a note to a person while all persons are being shown
Prerequisites: List all persons using the
listcommand. Multiple persons will be shown in the list.Test case:
addnote T0123456A n\Diabetes
Expected: The noteDiabeteswill be added to contact with the unique IC numberT0123456A. Successful note update message will be shown in the status message.Test case:
addnote T0123A
Expected: No note is added. Error details shown in the status message. Status bar remains the same.Other incorrect addnote commands to try:
addnote,addnote x,...(where x is the IC number which does not exist in the list)
Expected: Similar to previous.
Finding a person
Finding a person while all persons are being shown
Prerequisites: List all persons using the
listcommand. Multiple persons will be shown in the list.Test case:
find T0123456A
Expected: The contact with the unique IC numberT0123456Awill be displayed in the list. Details of person found will be shown in the status message.Test case:
find T0123A
Expected: No contact is found. Error details shown in the status message. Status bar remains the same.Other incorrect find commands to try:
find,find x,...(where x is the IC number which does not exist in the list)
Expected: Similar to previous.
Editing a person
Editing a person while all persons are being shown
Prerequisites: List all persons using the
listcommand. Multiple persons will be shown in the list.Test case:
edit T0123456A p\91234567 e\johndoe@example.com
Expected: The contact with the unique IC numberT0123456Awill be edited in the list. Updated details of person found will be shown in the status message.Test case:
edit T0123A
Expected: No contact is edited. Error details shown in the status message. Status bar remains the same.Other incorrect find commands to try:
edit,edit x,...(where x is the IC number which does not exist in the list)
Expected: Similar to previous.
Showing a person
Showing the note of a person while all persons are being shown
Prerequisites: List all persons using the
listcommand. Multiple persons will be shown in the list.Test case:
show T0123456A
Expected: The note of the contact with the unique IC numberT0123456Awill be shown in the patient notes panel. Successful show message will be shown in the status message.Test case:
show
Expected: The notes in the patient notes panel will be removed. Successful notes cleared message will be shown in the status message.Test case:
show T0123
Expected: If patient notes panel is previously empty, no note will be shown; If the patient notes panel already has a note, the note of the specifiedIC_NUMBERwill not be shown. Error details shown in the status message.Other incorrect find commands to try:
show x,...(where x is the IC number which does not exist in the list)
Expected: Similar to previous.
Appendix D: Effort
Effort
New Addition to classes
New classes were added which enhanced ClinicMate's Features. Below are some examples of the new classes added:
Model classes: IdentityCardNumber, Sex, Note
Command classes: show, addnote
We ensured that these new classes follow the code quality standard strictly and practiced defensive programming. A couple of test cases were also crafted in order to ensure that the new classes function as expected and meet the specified requirements. These test cases cover various scenarios and edge cases to validate the robustness and reliability of the code.
Enhancements to existing functions
Other than making changes to the existing commands by adding in more parameters, we put in significant effort to make sure the edited commands fits the features of ClinicMate.
For instance, the find command will allow users to find contact details with their IC, and more importantly, the user's notes will also appear on the patient notes panel.
This allowed for a more comprehensive view of contact's notes which is an important field that GPs will require. Hence, much effort was placed into enhancing existing features to improve usability of ClinicMate.
Improve User Interface of ClinicMate
Rather than the dark theme which ClinicMate originally had, we chose to go with a lighter theme and a bigger font size in order to improve readability of ClinicMate.
Effort was put in by us to learn different JavaFX markup elements such as the ScrollPane and SplitPanel in order to allow for a wider and better view of patient details in ClinicMate.
Challenges faced and how it was resolved
Challenge 1: Getting used to working in a team
The team definitely had a rough start during the beginning of the team project since most of the team were new to the GitHub workflow. The process of picking up the workflow was rocky, as we had difficulties understanding how issues, pull request and merging of branches worked. Merge conflict hindered the efficiency of our teamwork. However, after much help and guidance within the team, everyone in the team became more familiar with the workflow, which enhanced our collaboration.
Challenge 2: Delivering our product on time for each iteration
The team also faced difficulties in keeping track of the deliverables every week and during every iteration. We were not sure of the requirements that we needed to fulfill. Therefore, the team came together weekly to meet in order to better understand the deliverables needed and also to split the workload, increasing the productivity of the team.
Challenge 3: Enhancing our UI
To make our app look nicer and easier to understand, we had a tough time dealing with JavaFX features as we were newly introduced to it. Changing how things look on the screen was tricky because we needed to see it visually. Despite the challenge, we kept working on improving how our app looked and felt for users.
Challenge 4: Modifying the code to fit ClinicMate's features
The hardest challenge in which the team faced was to perform edits to the initial code which was provided to us. The large codebase required a very long time to understand and digest. This was made even more tough as we only started working on the code in the second half of the semester with limited time. However, through clarifying each other's doubts and questions, we were able to comprehend and made edits to the code eventually.
Achievements
Throughout the module, the team has gained much experience both in technical and soft skills. We definitely made significant improvements to our product through self-research, teamwork and support from each other. We got accustomed to the GitHub workflow, made use of JavaFX to implement our UI and most importantly, we developed a CLI application that adheres to rigorous code quality standards, ensuring readability and maintainability at the same time. The team definitely had many takeaways from this module.