Welcome to ClinicMate!
Your solution to streamlining patient contact management.
Greetings to esteemed General Practitioners (GPs)! Are you still grappling with traditional methods to manage patient details and take patients' histories? Are you overwhelmed by the challenge of organizing all your clinic's patient data?
Fret not! ClinicMate is your solution.
ClinicMate is tailor-made to streamline contact management in your clinic. Whether you're a seasoned practitioner or just starting out, ClinicMate is your indispensable companion.
This comprehensive user guide will effortlessly navigate you through ClinicMate's array of features, ensuring optimal efficiency in managing patient contacts.
Here is a quick overview of how ClinicMate streamlines contact management:
Navigation and Assistance Functions: Reset the interface using
clear, access comprehensive guidance throughhelp, andexitClinicMate with ease.Data Management Functions: Easily input, modify, and remove patient details through
add,editanddelete. View a detailed and comprehensive list of patient information effortlessly withlistandshowcommand. Effortlessly search for specific patient records withfind.Note-Taking Function: Use
addnoteto quickly append relevant notes to patient records for future reference.
ClinicMate is a desktop application featuring a Command Line Interface (CLI) with the convenience of a Graphical User Interface (GUI). Whether you're adept at typing or prefer a visual interface, ClinicMate ensures swift and efficient management of patient contacts.
Bid farewell to cumbersome paperwork and embrace the efficiency of ClinicMate in organizing your clinic's patient data.
Table of Contents
Guide Usage
Welcome to the comprehensive user guide for ClinicMate! Our goal is to provide you with the knowledge and tools necessary to make the most of ClinicMate, your essential tool for clinic management. Whether you're a beginner or an experienced user, we're here to support you every step of the way.
Before we dive into the details, let's acquaint ourselves with the annotations you'll encounter throughout this user guide. These annotations will help you understand and navigate ClinicMate's features smoothly.
lightbulb Useful Tip:
- Provides additional insights and tips to enhance your ClinicMate experience.
edit Note:
- Provides valuable additional details for using ClinicMate effectively.
warning Warning:
- Alerts you to potential pitfalls or issues to be mindful of when using ClinicMate.
Throughout this guide, you'll also encounter various text styles. Here's what they represent:
- Used to illustrate possible scenarios for utilizing a feature (mostly in feature sections).
- Represents hyperlinks that you can click to navigate to another section of this user guide or to an external website.
Highlights specific elements such as file names, commands, or any text that should be treated as code.Provides information about the parameters that you can input into a command.
Now that you're familiar with the annotations and text styles, we will give you a tour on how to navigate this user guide based on your level of expertise.
ClinicMate Beginner?
Thank you for choosing ClinicMate for your patient management needs! We're excited to help you jump right in.
- To get started, head over to the Quick Start section to set up ClinicMate on your computer.
- Once you've set up ClinicMate, go through the Quick Tour to discover key features of ClinicMate that you'll use frequently.
- If you're keen to explore ClinicMate by yourself, take a look at the Existing Features to dive deep into ClinicMate's functionalities.
Seasoned ClinicMate User?
Welcome back! We're thrilled to have you with us again.
- If you want a reminder on how to use a feature, head over to the Existing Features section to get detailed instructions for each feature and examples that you can learn from.
- If you just need a quick reference of a command format, you can refer to the Command Summary section for a table of all the commands and their format available in ClinicMate.
If you have more questions, do check out the FAQ section to see if there are answers to your queries.
↑ Back to Top ↑ Back to Table of Contents
Quick start
In this section, you will learn how to set up ClinicMate on your computer.
Prerequisites
- Open Command Prompt (for Windows) or Terminal (for MacOS and Linux) on your desktop. Refer to our FAQ on how to do so.
- Run the command
java -versionto check if you have Java 11 or above installed in your computer.
- Assuming that you have Java installed in your computer,
If you are running Windows, this is what you should see after running the command.
- Over here, the Java version is 19.0.2, which means that Java 19 is installed.

- Over here, the Java version is 19.0.2, which means that Java 19 is installed.
If you are running MacOS, this is what you should see after running the command.
- Over here, the Java version is 11.0.19, which means that Java 11 is installed.

- Over here, the Java version is 11.0.19, which means that Java 11 is installed.
- If you do not have Java 11 or above installed in your computer, download it from here.
Setting up
- Download the latest
clinicmate.jarfile here - You will see this screen after clicking on the link above.
- Click on the
clinicmate.jarfile to download it.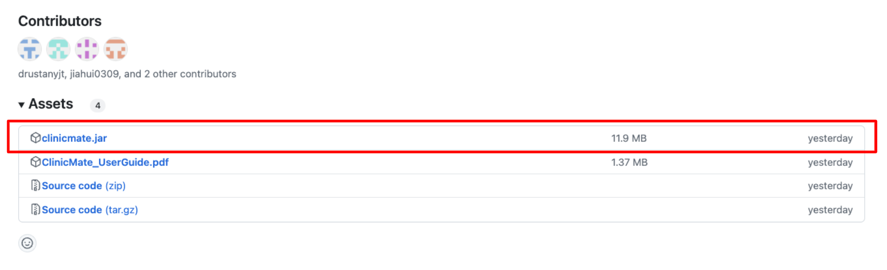
- Click on the
- Move the file to an empty folder that you want to use for your ClinicMate.
- For example, you can create an empty folder named
clinicmatein yourDocumentsfolder. - You can then move the
clinicmate.jarfile to that folder namedclinicmatein yourDocumentsfolder.
- For example, you can create an empty folder named
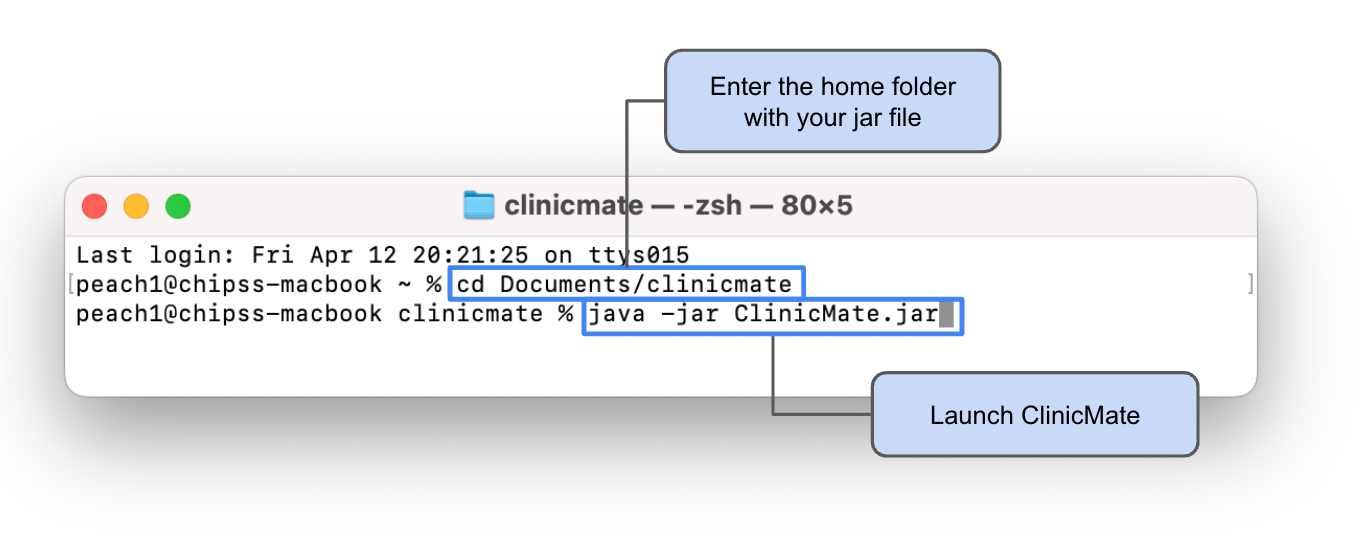
Running the application
- Open Command Prompt (for Windows) or Terminal (for MacOS and Linux) on your desktop. Refer to our FAQ on how to do so.
- Run the
cdcommand into the folder you put the jar file in.cdis the command to change directory.- e.g.
cd Documents/clinicmate
- Run the
java -jar clinicmate.jarcommand to run the application. - Your command terminal should look like this after steps 2 and 3.
warning Warning:
- If you do not see sample data when running
java -jar clinicmate.jar, that means you have an existing data file which needs to be removed. - You may notice that a new folder named
datais newly created. This folder contains the data file for ClinicMate. - Do not delete this folder or its contents as it contains your patient data.
- You should see the following screen after running the
java -jar clinicmate.jarcommand.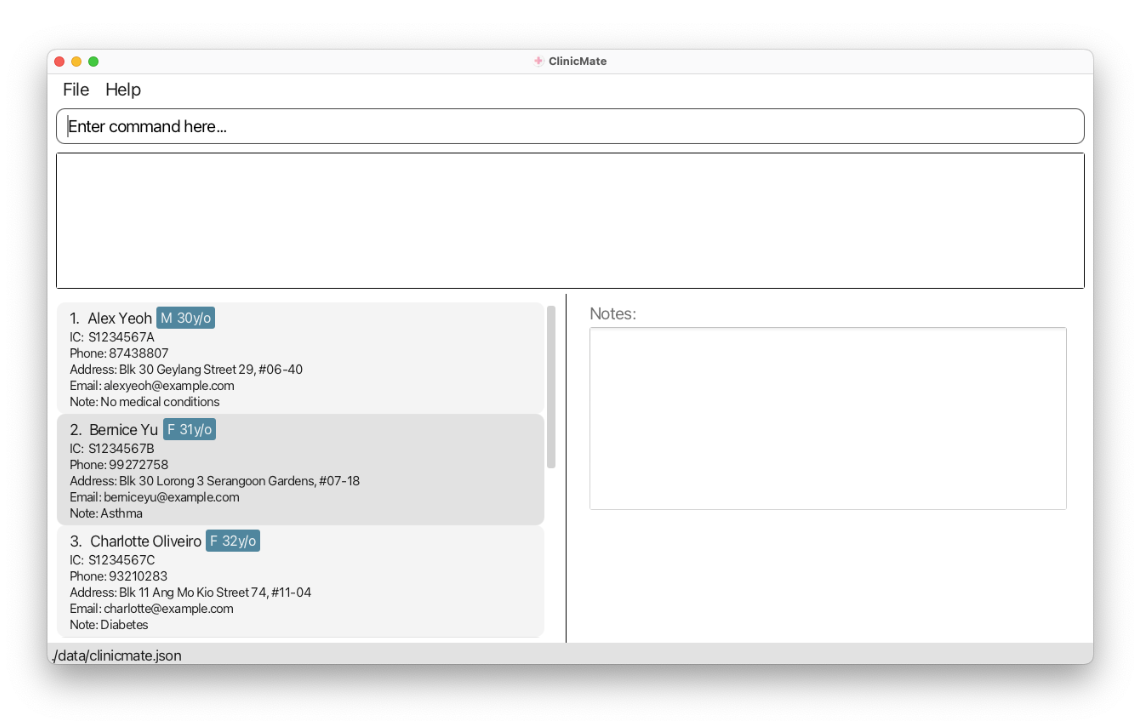
- Great job! You have successfully set up ClinicMate on your computer. You are now ready to learn about the GUI of ClinicMate!
↑ Back to Top ↑ Back to Table of Contents
GUI Overview
ClinicMate features a Graphical User Interface (GUI) that provides a seamless user experience. The GUI is designed to be intuitive and user-friendly, allowing you to navigate through the application effortlessly.
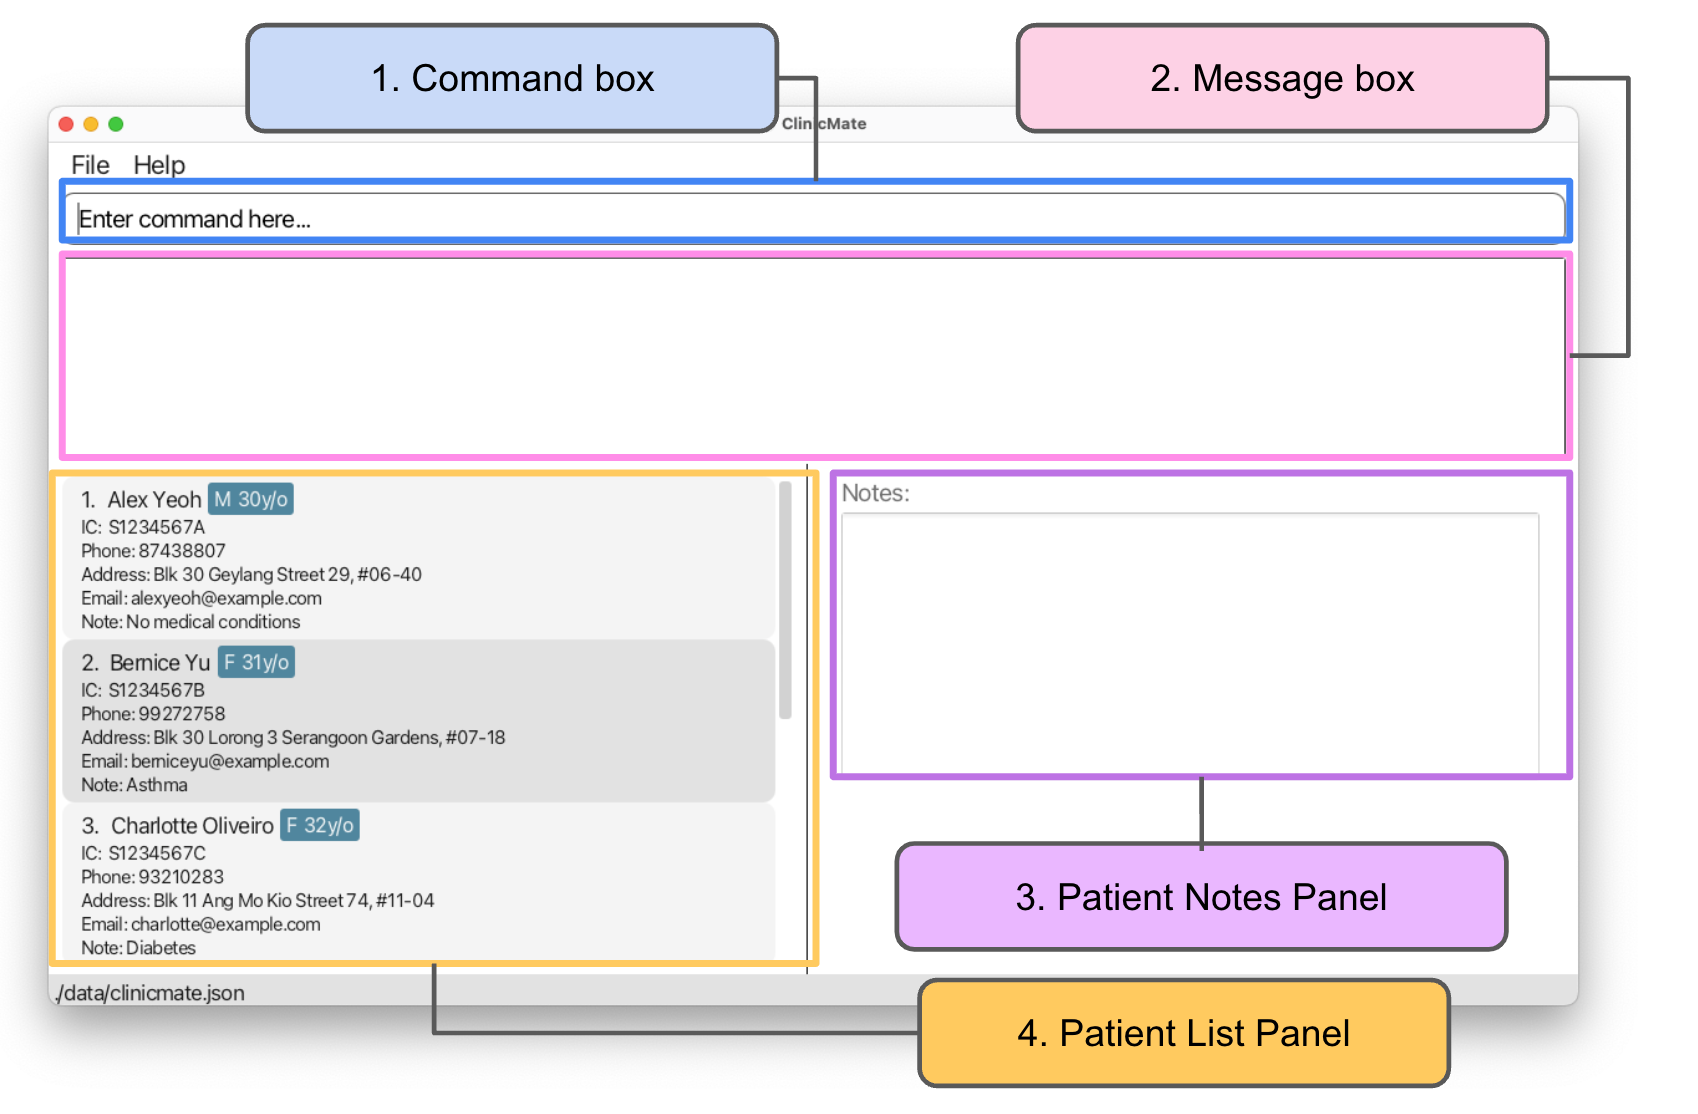
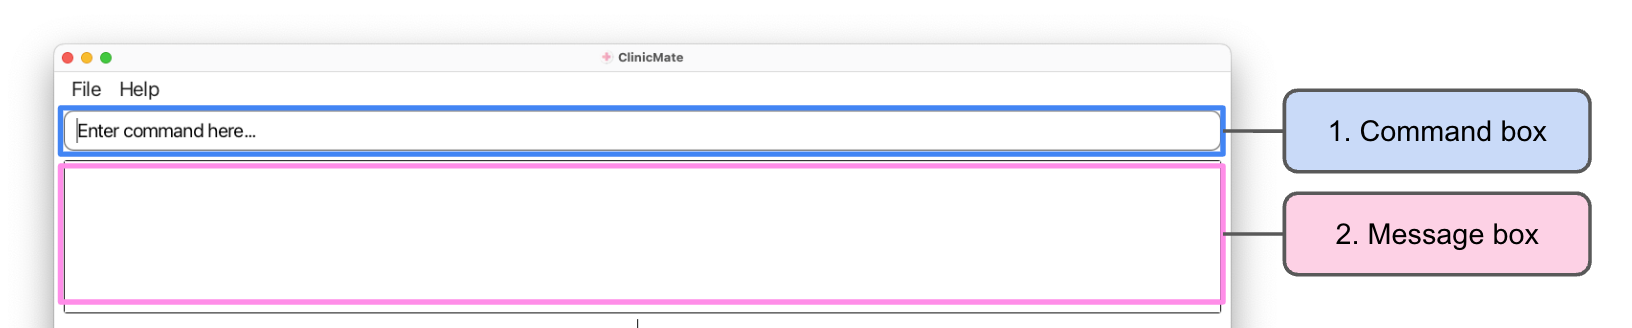
The GUI consists of the following components:
| Number | Component | Description |
|---|---|---|
| 1 | Command Box | Enter commands here to interact with ClinicMate. |
| 2 | Message Box | Displays the output of commands executed in the Command Box. |
| 3 | Patient List Panel | Displays the list of patients in ClinicMate. |
| 4 | Patient Notes Panel | Displays the notes of the patient that you are viewing. |
lightbulb Useful Tip:
- To maximise your viewing experience, opt for full-screen mode in ClinicMate!
Now that you have been introduced to the GUI components, let's proceed to learn how you can use the CLI to interact with ClinicMate.
CLI Overview
Experience the seamless power of ClinicMate's Command Line Interface (CLI) - where interaction is as simple as typing commands. Say goodbye to juggling between typing and clicking, and welcome the streamlined efficiency of CLI!
CLI is straightforward to use. The Command Box acts as your entry point for commands. Once you hit enter, ClinicMate processes your input and delivers responses through the Message Box. It's all about interacting with ClinicMate effortlessly through text.
Ready to dive in? Let's explore writing command lines and get you started with ClinicMate!
Command Format
To use our CLI, here is an overview of the command formats.
| Component | Example | Description |
|---|---|---|
| Command | add | Represents the action that you want to perform. |
| Parameter | Mary | Represents a value that replaces the UPPER_CASE placeholders in the command format. |
| Prefix | n\ | Represents the type of parameter to be edited. |
| Flag | -replace | Represents an additional parameter that modifies the command's behavior. Must be used at the end of the command. |
You can find all the parameters used in ClinicMate here. To learn more about the prefixes and command words used in ClinicMate, you can refer to the Command Summary Section.
Let's see how these components are used in a command!
Example Command: addnote
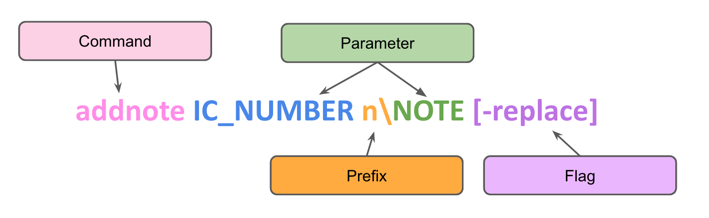
You can substitute specific parameter values into the parameters in the command format. For instance, in the addnote command, you can replace IC_NUMBER with the patient's IC number and NOTE with the note you want to add.
But what about the [] around -replace? Here's more about it:
| Symbol | Description | Example | Meaning |
|---|---|---|---|
[] | Indicates that something is optional | [-replace] | The -replace flag is optional and can be included or excluded in the command. |
| None | Indicates a mandatory prefix and/or parameter | n\NOTE | The n\NOTE is mandatory and must be included in the command. |
↑ Back to Top ↑ Back to Table of Contents
Quick Tour: A First Look At ClinicMate
If this is your first time using ClinicMate, welcome! We know that patient management can be tedious and cumbersome, and learning a new tool might seem like a daunting task. But fret not! ClinicMate is designed to be user-friendly and intuitive so that you can start streamlining your patient management right away.
This tour will guide you through the key features of ClinicMate, giving you a quick overview of how to use the application effectively, especially the more commonly used commands. You'll learn how to:
Make sure you've set up ClinicMate on your computer by following the Quick Start guide, if you haven't already. Once you're ready, let's dive in!
1. Adding a Patient
Adding a patient is a fundamental feature of ClinicMate for tracking patient details. Let's say you have a new patient with the following particulars:
- Name: James Tan
- Phone: 92223344
- Email: james.tan@mail.com
- IC Number: S1234567A
- Age: 22
- Sex: M
- Address: Block 11, #07-07, Jurong West Ave 6
For new patients, the first step always involves registration. Similarly, let's add James Tan to ClinicMate!
Steps:
- Using his details, simply type
add n\James Tan p\92223344 e\james.tan@mail.com i\S1234567A ag\35 s\M a\Block 11, #07-07, Jurong West Ave 6into the Command Box and hit enter.

- The patient list panel will be updated with James Tan's details.
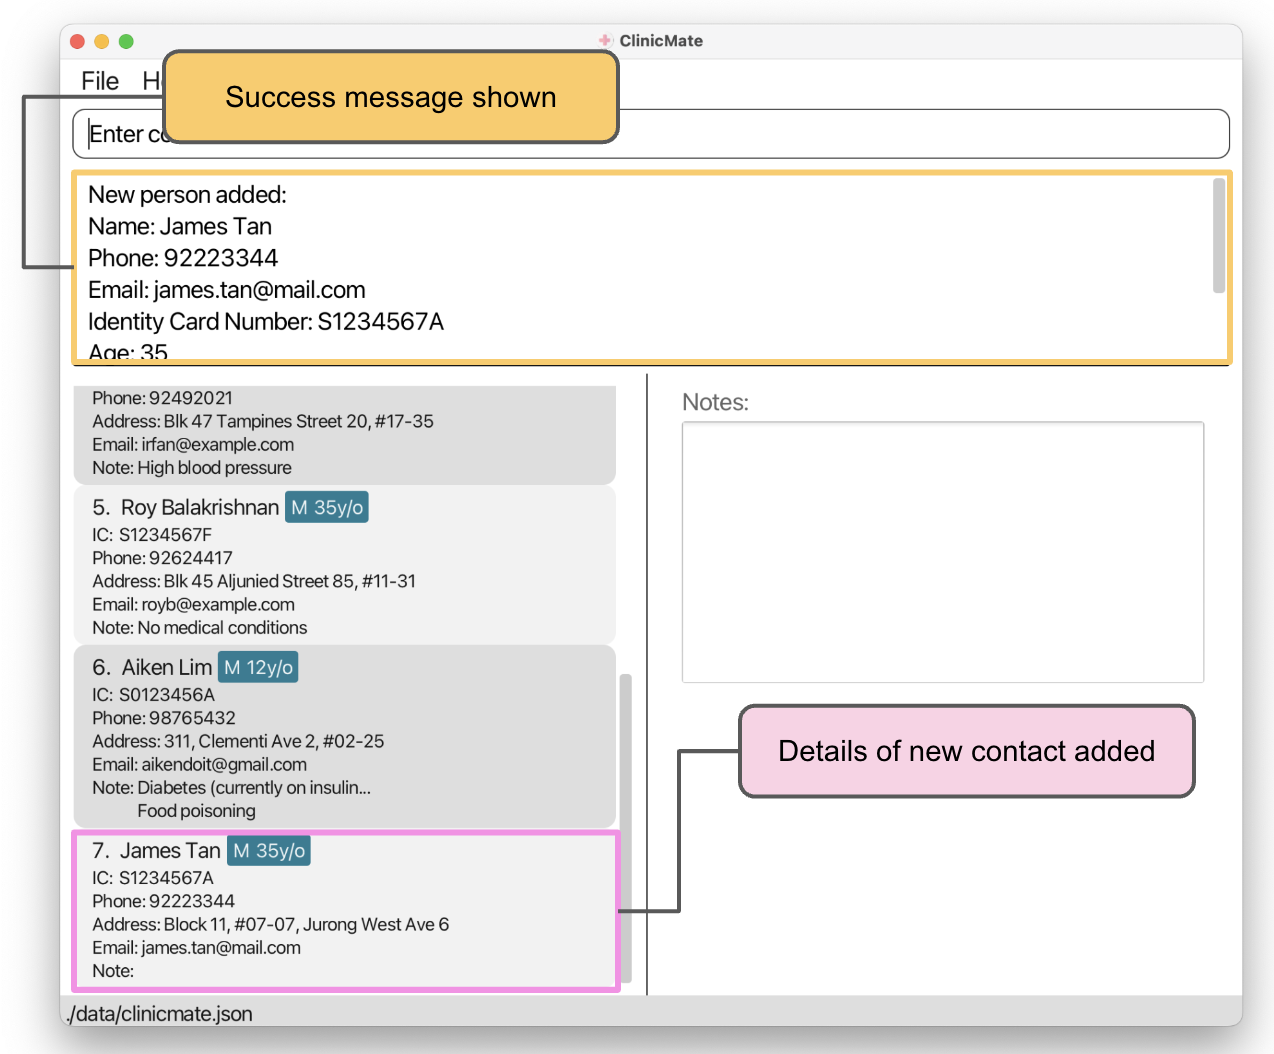
Congratulations! You've successfully added James Tan to ClinicMate. Go ahead and try adding more patients of your own to practice!
If you wish to learn more about the add command, you can refer to this.
2. Finding a Patient
Many walk-in patients tend to be regulars at the clinic. ClinicMate is optimized to retrieve patient details quickly and easily. All you need is their IC number!
Steps:
- Let's say you want to find James Tan's details after adding him in the previous step. Type
find S1234567Ainto the Command Box and hit enter. - The patient list panel will display James Tan's details only. The patient notes panel will show any notes associated with James Tan.
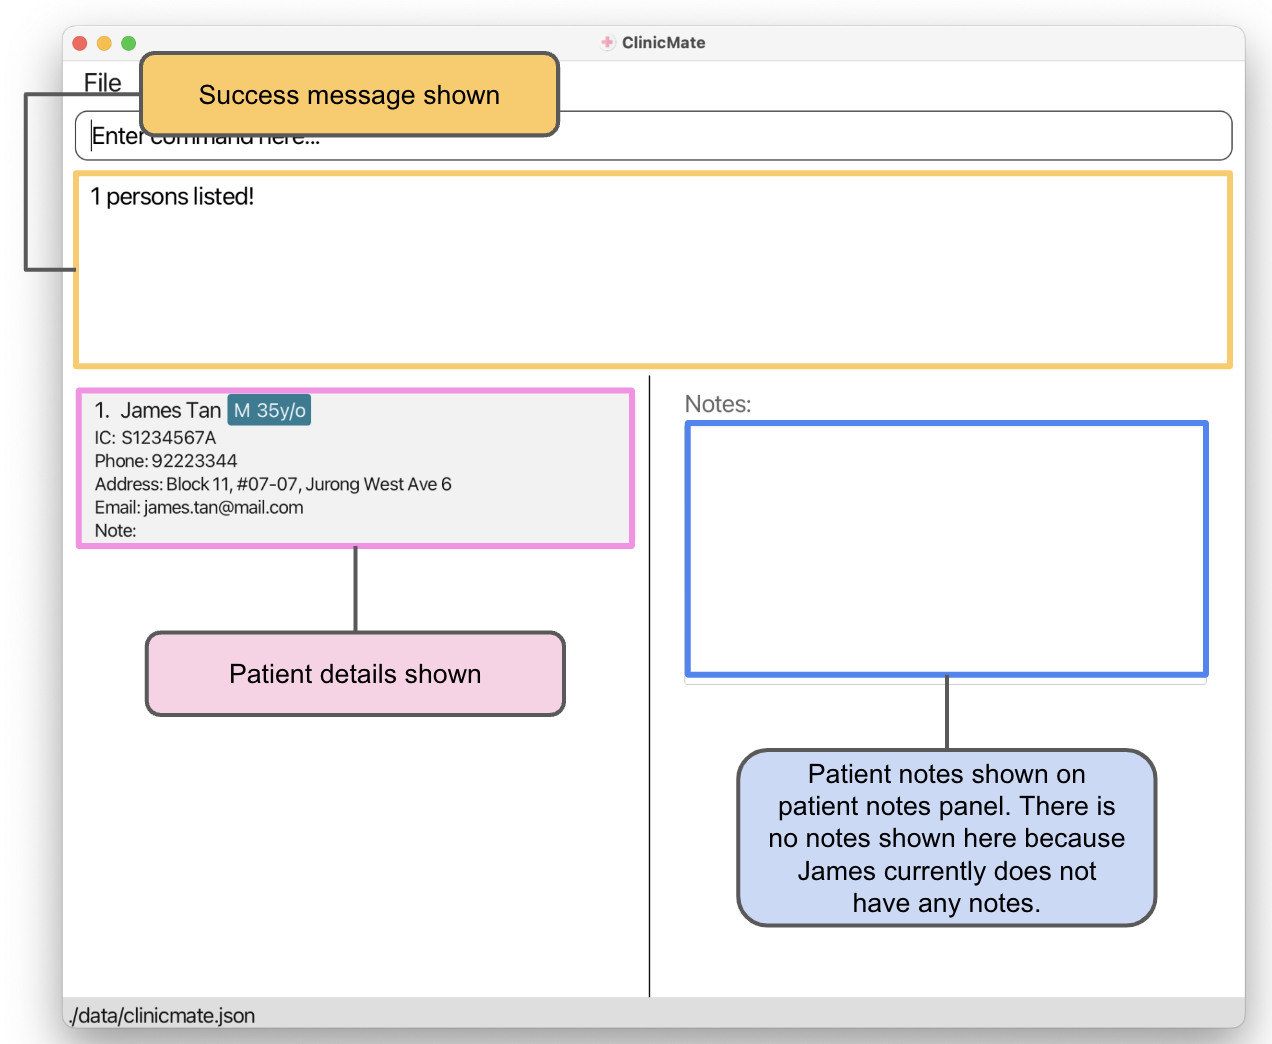
Go ahead and try viewing the details of other patients using the find command!
If you wish to learn more about the find command, you can refer to this.
3. Adding Notes to a Patient
A big part of a GP consultation is taking patient history. ClinicMate allows you to add notes for patients based on their IC number.
Steps:
- Suppose in your consultation, James Tan complains of frequent urination (polyuria) and excessive thirst (polydipsia), and you suspect he might have Diabetes Mellitus. You can note this down using the shorthands that you're used too! Simply type
addnote S1234567A n\Polyuria & polydipsia. DM?into the Command Box and hit enter.

- Through the consultation, you also find out he has a family history of Diabetes Mellitus.
addnotelets you quickly append this information by simply typingaddnote S1234567A n\Fam his of DM.into the Command Box and hit enter.
Notice that the notes are appended without replacing what was originally there, so you can quickly add all notes you find important without worry!
If you wish to replace the notes, or find out more about the addnote command, you can refer to this.
4. Deleting a Patient from ClinicMate
Suppose James Tan informs you that he is moving house, and will no longer be visiting your clinic. ClinicMate lets you remove his details from the database with ease.
Steps:
- Type
delete S1234567Ainto the Command Box and hit enter.
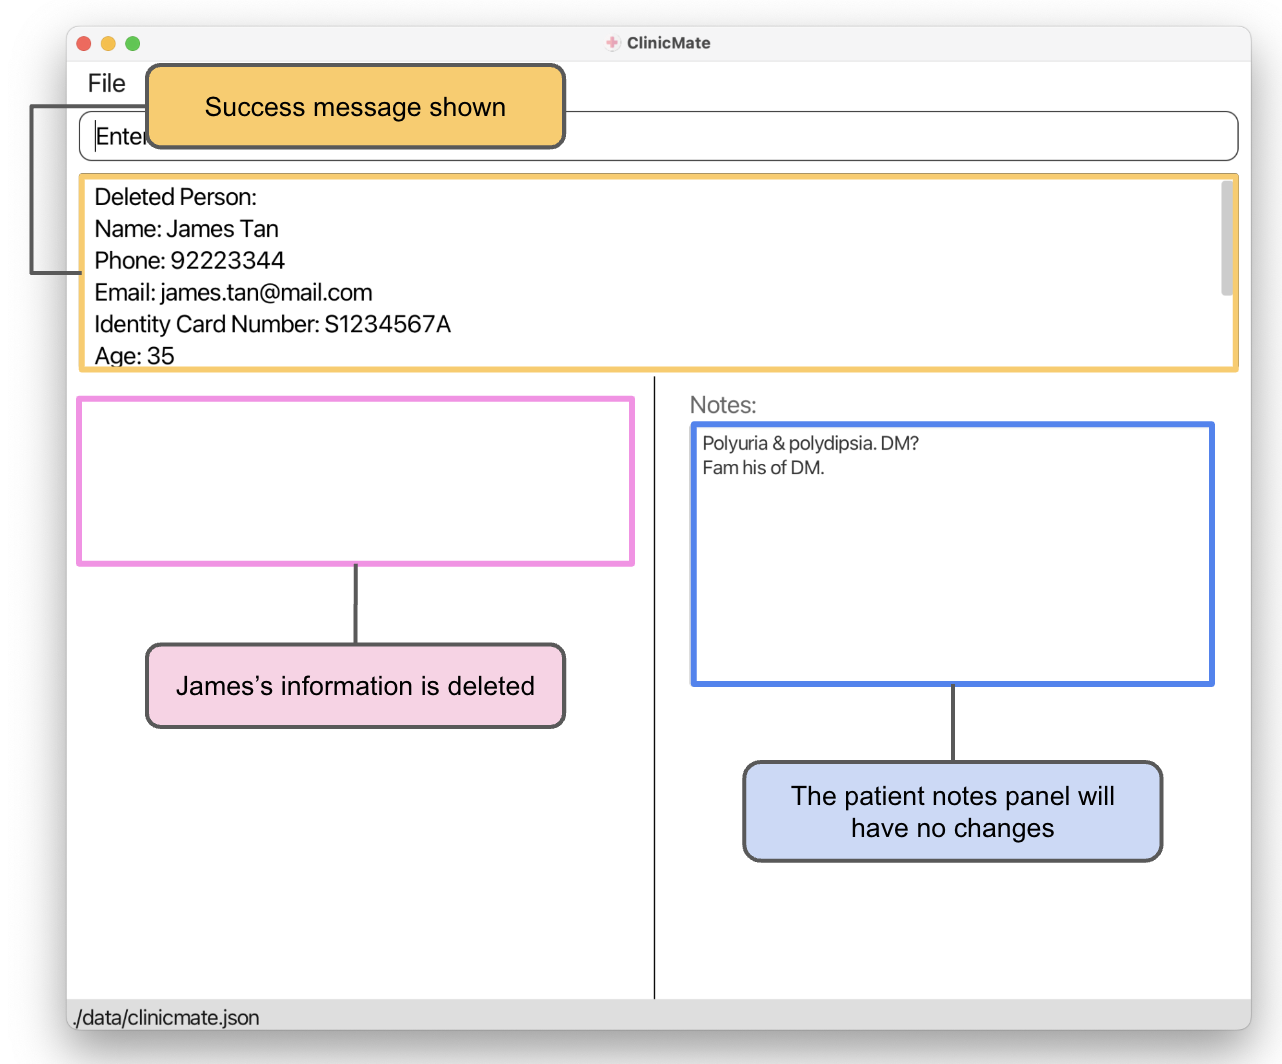
- Type
listto see your whole patient list panel.James Tandetails will be removed from the patient list panel. There is no change to the patient notes panel.
Go ahead and try deleting some of the sample patients from ClinicMate.
If you wish to find out more about the delete command, you can refer to this.
You've now reached the end of the Quick Tour. Congratulations!
To remove the sample data, you can use the clear command followed by the show command to reset the patient list and notes panels.
Find out more about the clear and show commands here and here respectively.
There are more features in ClinicMate that you can explore. If you're interested, you can refer to the Existing Features section for a detailed guide on each feature. Also check out the FAQ section for answers to common queries!
↑ Back to Top ↑ Back to Table of Contents
Existing Features
This section gives you a step-by-step guide on how to use ClinicMate's features. The 3 categories of ClinicMate's features are as follows:
Navigation and Assistance Functions:
clear,help,exitData Management Functions:
add,edit,delete,show,find,listNote-Taking Function:
addnote
edit Note:
Words in
UPPER_CASEare the parameters to be supplied by the user.
e.g. inadd n\NAME,NAMEis a parameter which can be used asadd n\John Doe.Parameters that have a slash prefix (1 or more letters followed by a
\) can be in any order.
e.g. if the command specifiesn\NAME i\IC_NUMBER,i\IC_NUMBER n\NAMEis also acceptable.Parameters that have no prefix must follow the specified order.
e.g. if the command specifiesIC_NUMBER n\NAME i\IC_NUMBER,IC_NUMBERmust come before any of the parameters with a prefix.Extraneous parameters for commands that do not take in parameters (such as
help,list,exitandclear) will be ignored.
e.g. if the command specifieshelp 123, it will be interpreted ashelp.If you are using a PDF version of this document, be careful when copying and pasting commands that span multiple lines as space characters surrounding line-breaks may be omitted when copied over to the application.
Navigation and Assistance Functions
Navigation and Assistance Functions in ClinicMate serve to enhance user experience and streamline workflows within the clinic management software.
Viewing help : help
Encountering a roadblock in ClinicMate? No problem! Simply utilize the help command for immediate assistance and guidance.
Format: help
Steps:
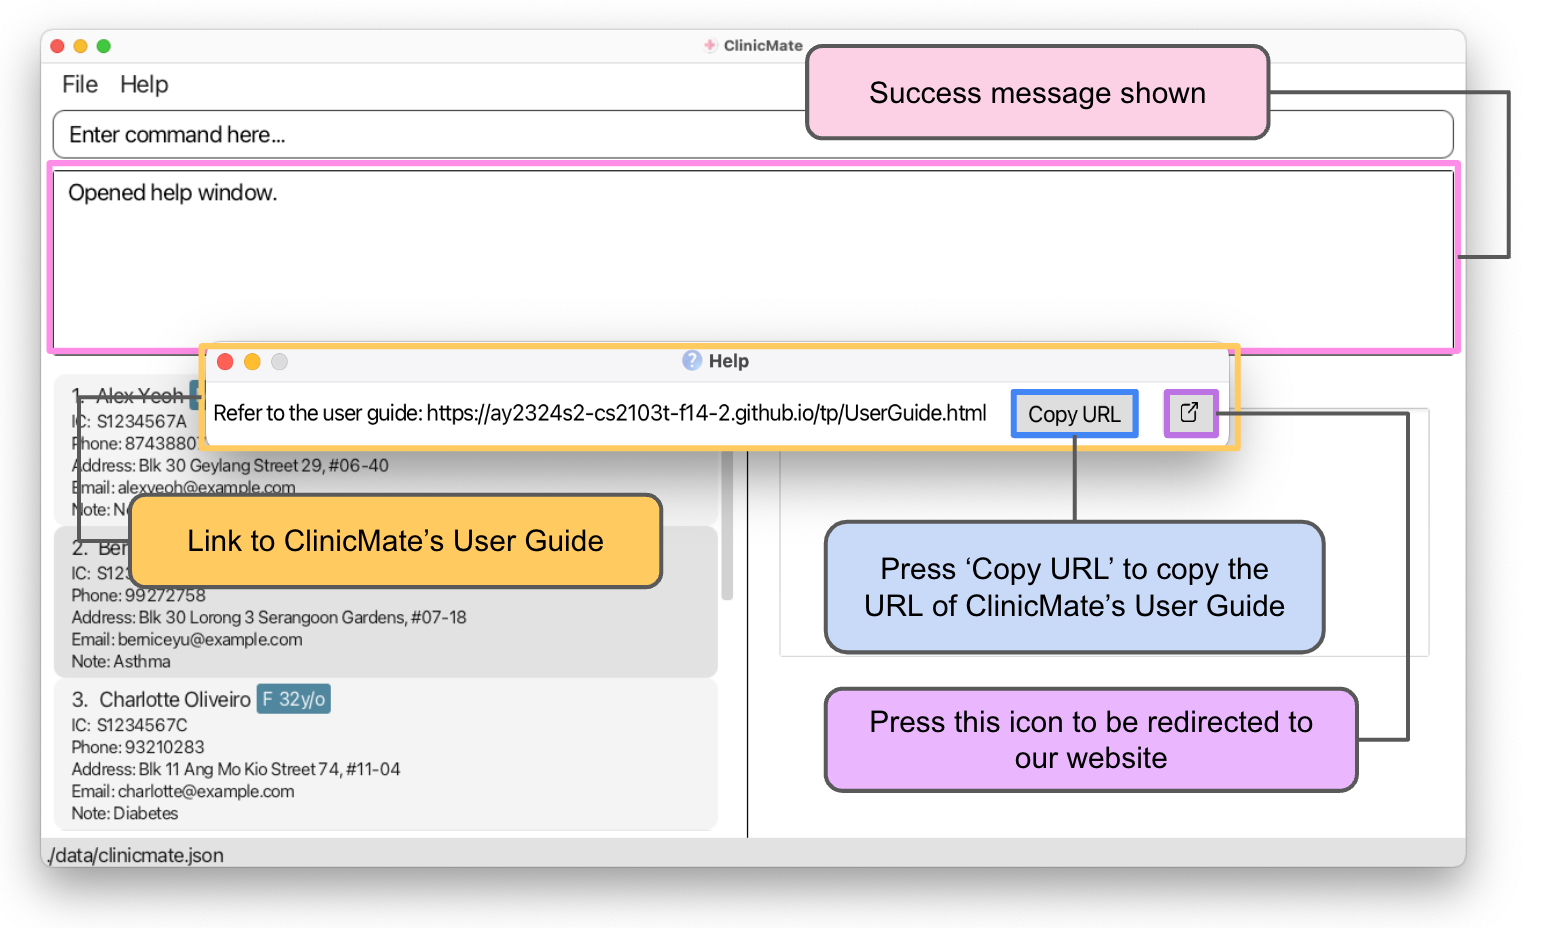
- Enter
helpinto the command box. A help window should pop up. - You can access help by either:
- Copying our User Guide's link through the Copy URL button and pasting it in your web browser.
- Directly accessing our website through pressing on the icon.
↑ Back to Top ↑ Back to Table of Contents
Clearing all entries : clear
Transitioning to a new clinic? Easily clear existing data from ClinicMate with a simple clear command!
Format: clear
Steps:
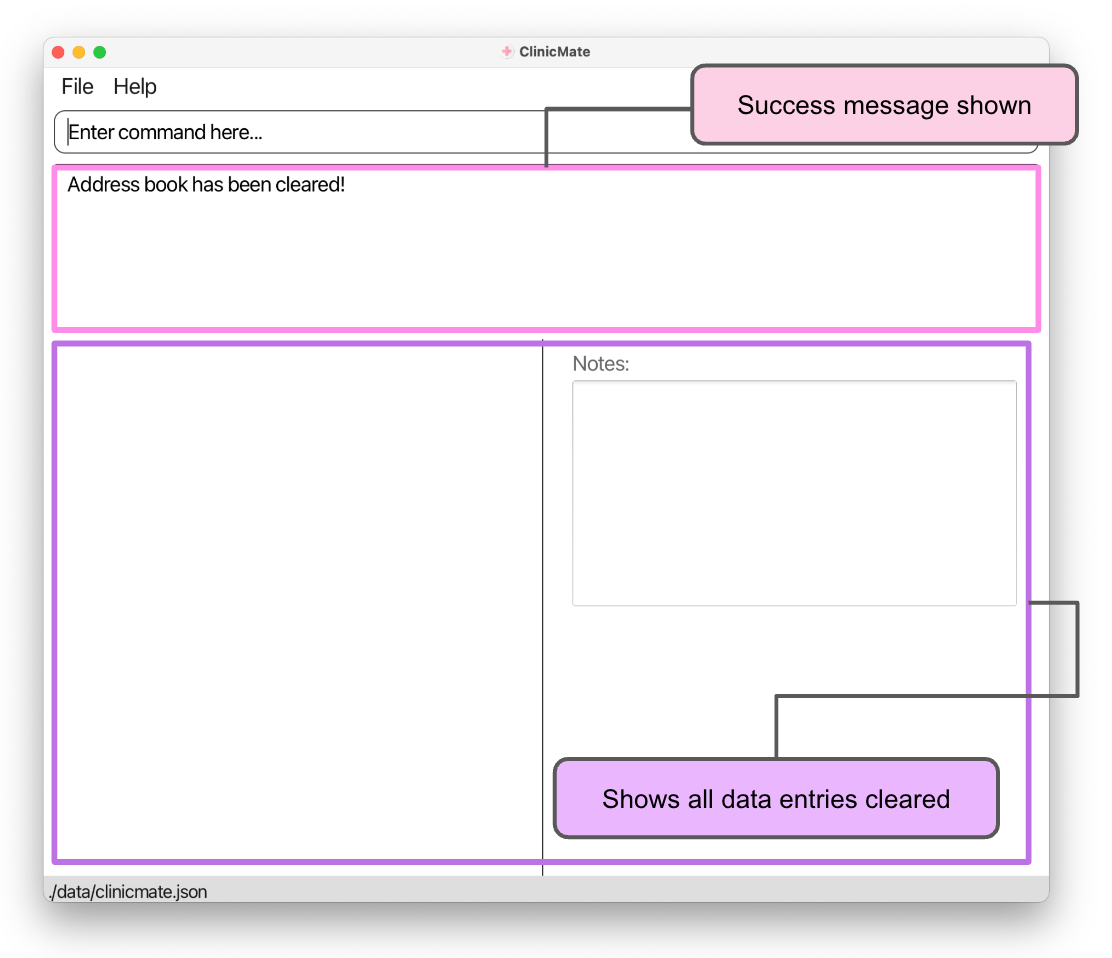
- Enter
clearinto the command box. The patient list panel containing all the entries will then be cleared.
warning Warning:
clear is a one-time deletion of all of your entries in ClinicMate. Please use it with consideration and care. You will not be able to retrieve any information back once the command has been executed.
↑ Back to Top ↑ Back to Table of Contents
Exiting the program : exit
Concluding your session? Simply use the exit command to gracefully exit the program and conclude your session.
Format: exit
Steps:
- Enter
exitinto the command box. You will then be directed out of ClinicMate.
edit Note:
Don't worry about losing your data when exiting. They will be automatically saved!
↑ Back to Top ↑ Back to Table of Contents
Data Management Functions
Data Management Functions in ClinicMate serve to simplify the process of adding, editing and deleting patient's information. It also enables you to view a comprehensive list of patient information and effortlessly search for specific patient records.
Adding a person: add
Registering a new patient? No worries! Our add command simplifies the process of adding their details to ClinicMate.
Format: add n\NAME p\PHONE e\EMAIL i\IC_NUMBER ag\AGE s\SEX a\ADDRESS
Steps:
- Enter
add n\NAME p\PHONE e\EMAIL i\IC_NUMBER ag\AGE s\SEX a\ADDRESSinto the command box. - New entry with particulars of
n\NAME p\PHONE e\EMAIL i\IC_NUMBER ag\AGE s\SEX a\ADDRESSis added.
edit Note:
- A person will be uniquely identified by his/her IC number.
- ClinicMate does not allow the same IC number to be used twice.
- Most of our fields do not have constraints as we want the application to be less restrictive 😃
- Do refer to our Parameters Description section to find out more about our parameter constraints.
Example:
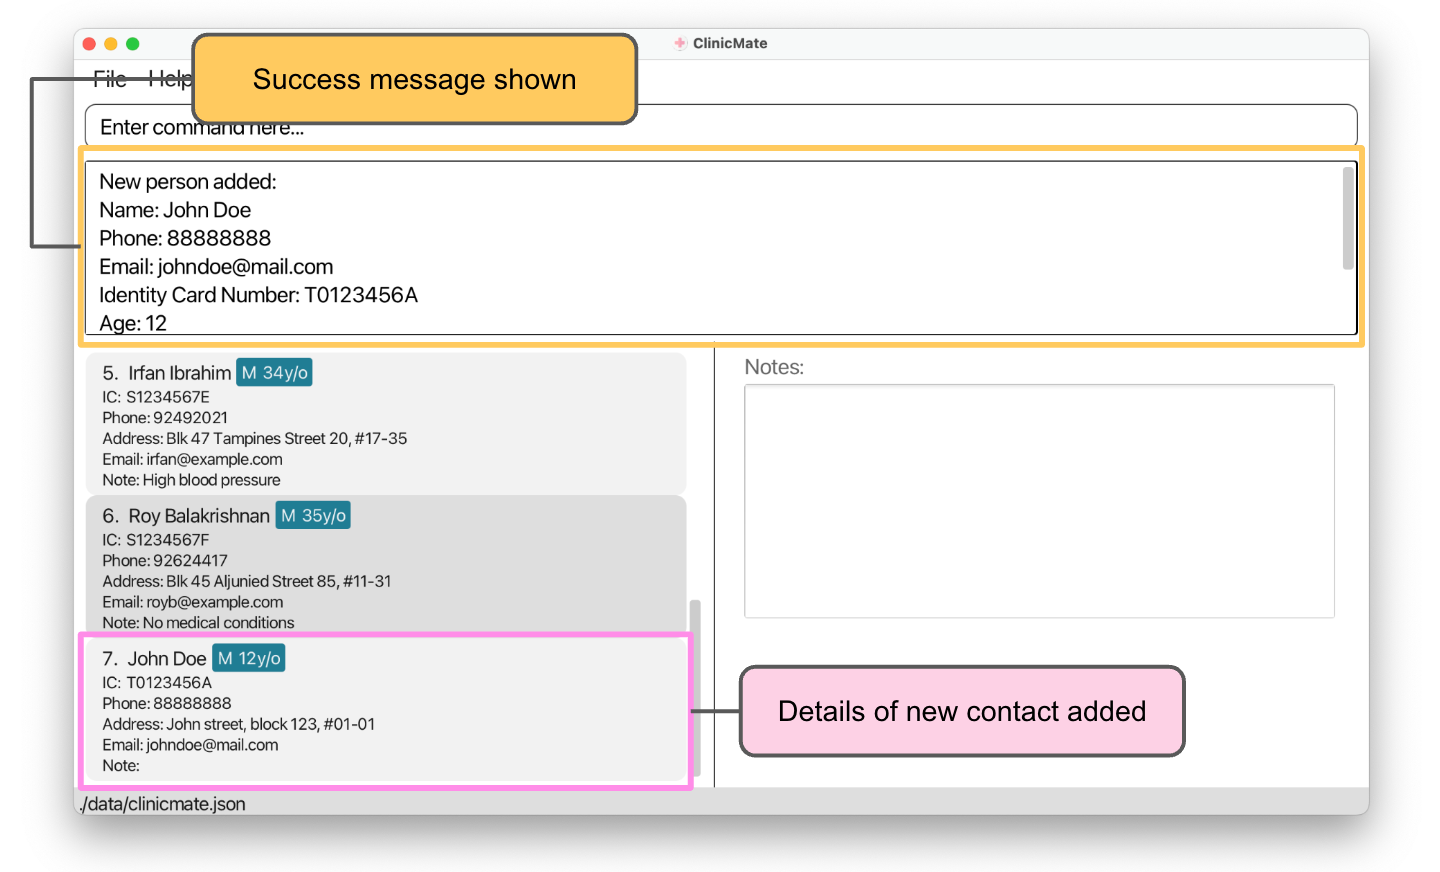
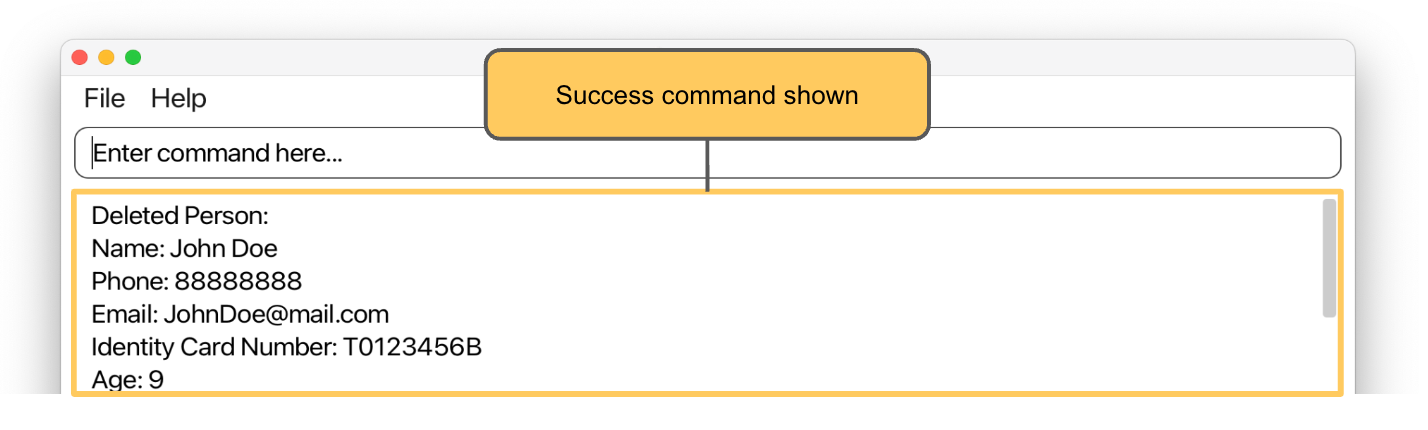
add n\John Doe p\88888888 e\johndoe@mail.com i\T0123456A ag\12 s\M a\John street, block 123, #01-01
What a successful add command looks like:
lightbulb Useful Tip:
A person can have a note included (See addnote command).
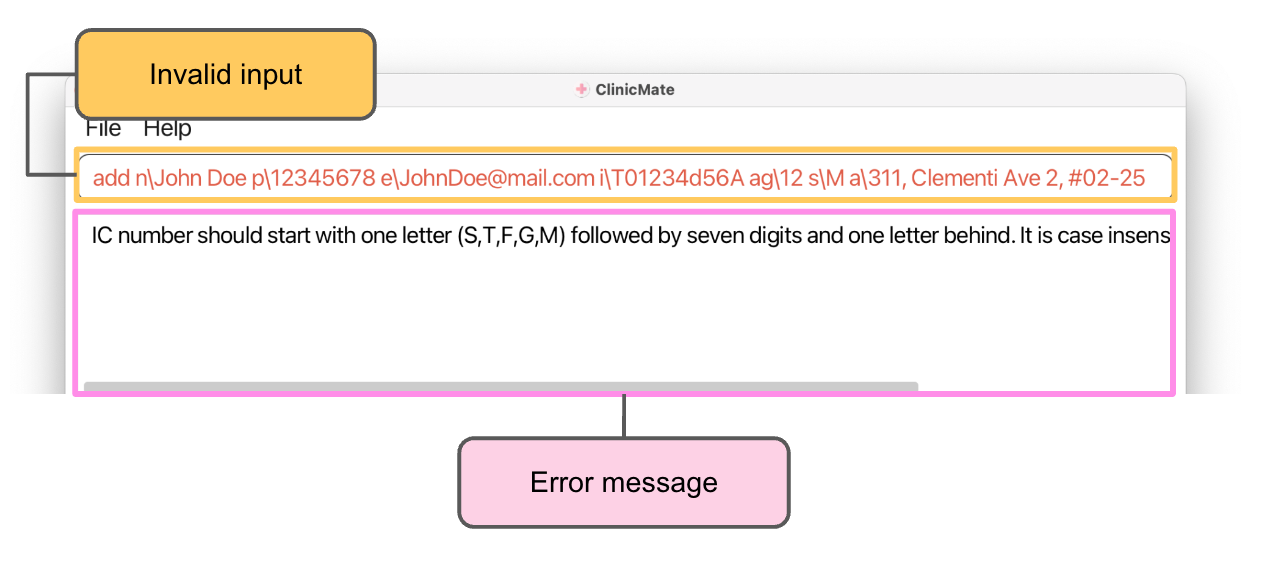
Possible Error that you might encounter:
You might encounter error messages due to the lack of familiarity with the application. There is no need to panic as our error messages will tell you how you can solve them!
An example is shown below:
↑ Back to Top ↑ Back to Table of Contents
Listing all entries : list
Looking for a comprehensive overview of your patient entries in ClinicMate? Utilize the list command for quick access to all your patient records.
Format: list
Steps:
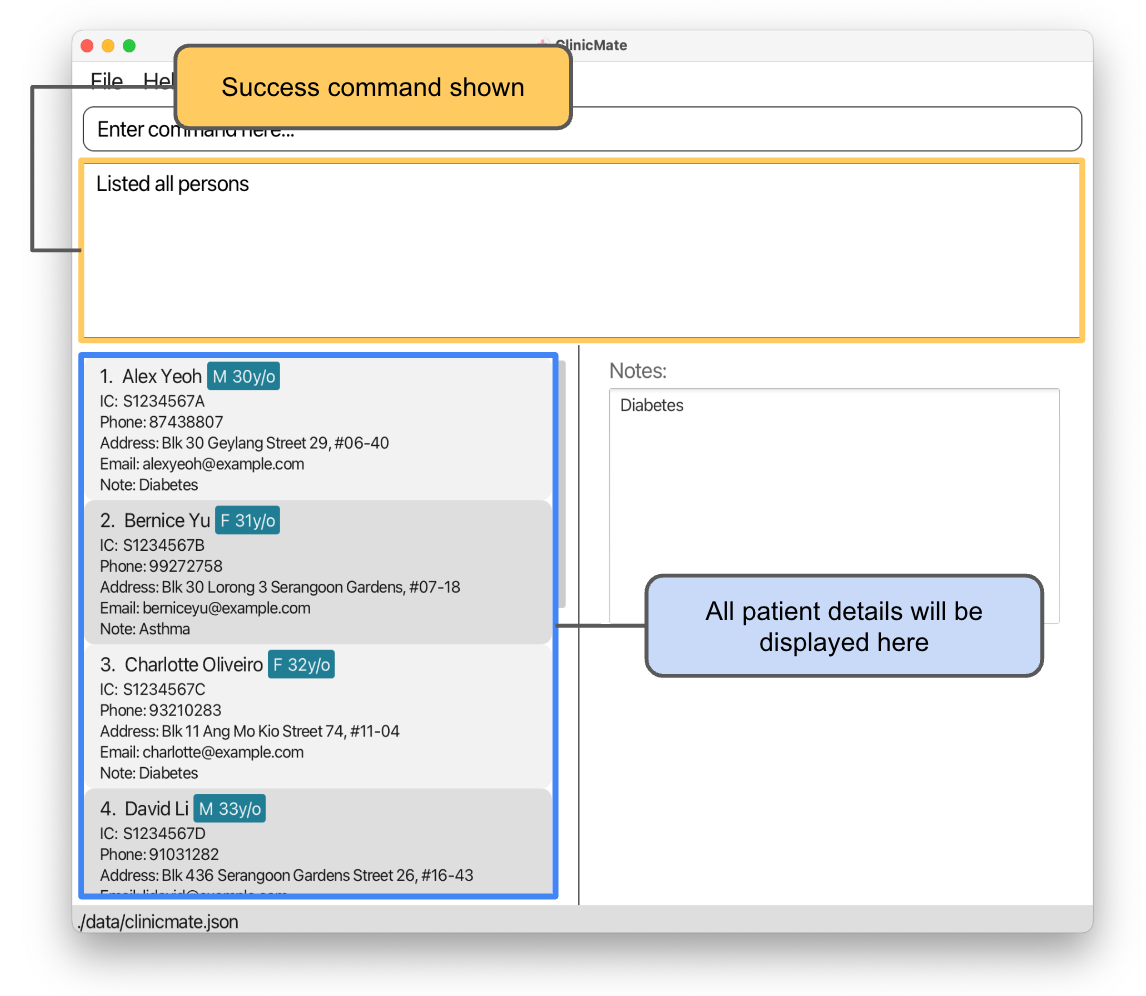
- Enter
listinto the command box. All of your patient details will then be displayed.
↑ Back to Top ↑ Back to Table of Contents
Finding person by IC number: find
Today, your regular patient arrives at the clinic, and you need to retrieve her record. However, with a multitude of contacts, locating hers seems daunting. Fear not! Utilize the find command to swiftly pinpoint the specific patient you're searching for using their IC_NUMBER.
lightbulb Useful Tip:
ClinicMate will display their contact information on the patient list panel and their full notes on the patient notes panel, for a more comprehensive view.
Format: find IC_NUMBER
Steps:
- Enter
find IC_NUMBERinto the command box. - The patient record with the corresponding
IC_NUMBERwill be retrieved, with his/her notes shown in the patient notes panel.
edit Note:
- Only one patient record will be retrieved at any one time.
- Finds the person with the specified
IC_NUMBER. - The
IC_NUMBERrefers to the IC number shown in the displayed patient list panel. - The
IC_NUMBERmust be the FULL IC NUMBER. - The search is case-insensitive. e.g
t0123456awill matchT0123456A. - Only the IC number is searched.
- Only full IC number will be matched e.g.
T0123456Awill not matchT0123A.
Example:
find T0123456AreturnsJohn Doe.
What successful find commands look like:
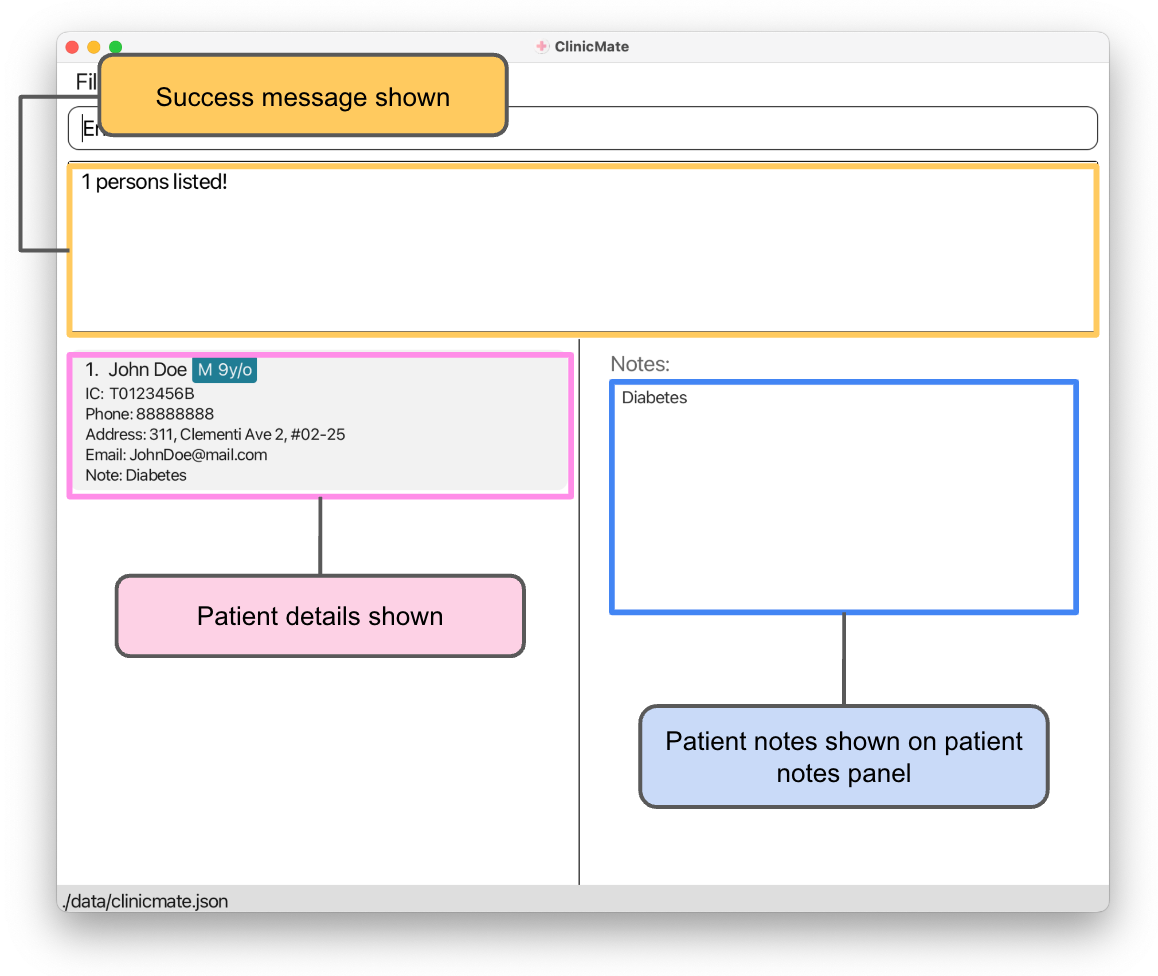 What this means: There is a person matching the
 IC_NUMBER in the patient list panel in ClinicMate.
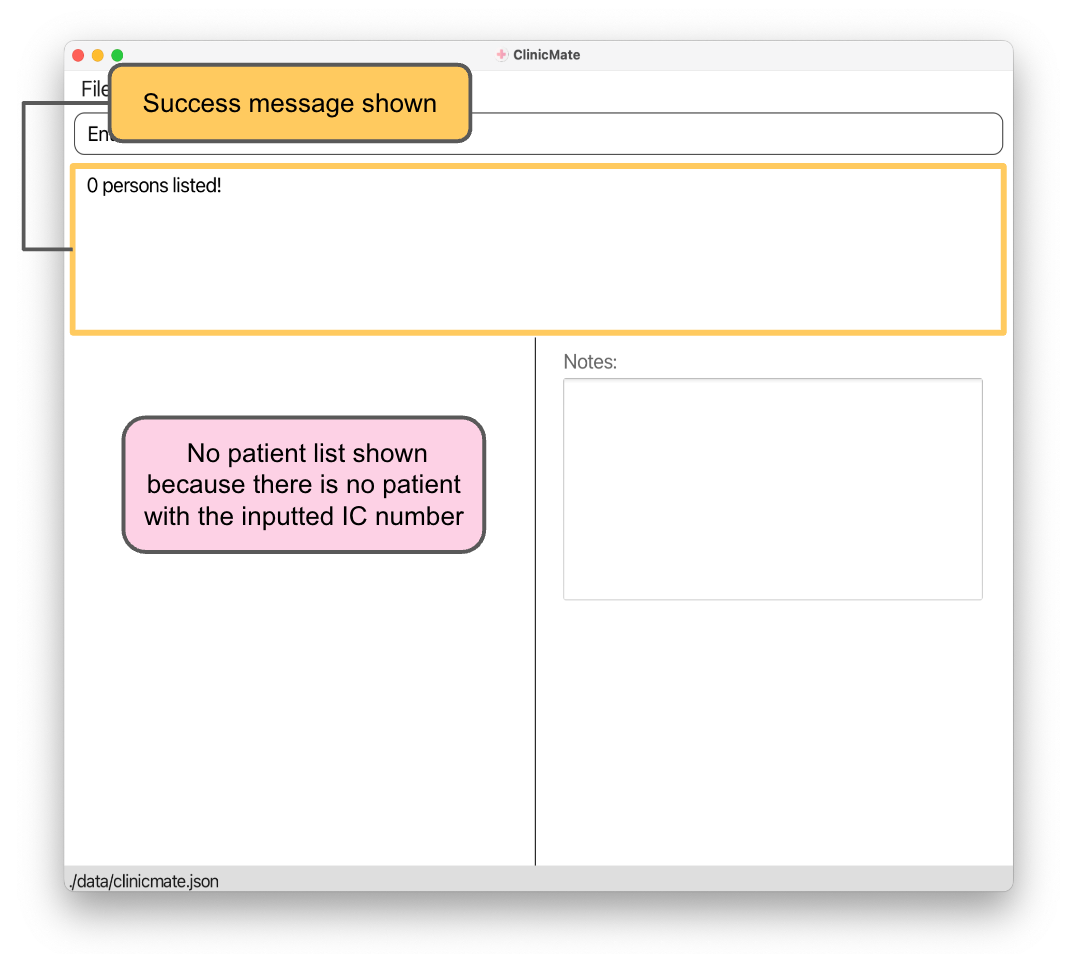 What this means: There is no one matching the
 IC_NUMBER in the patient list panel in ClinicMate.
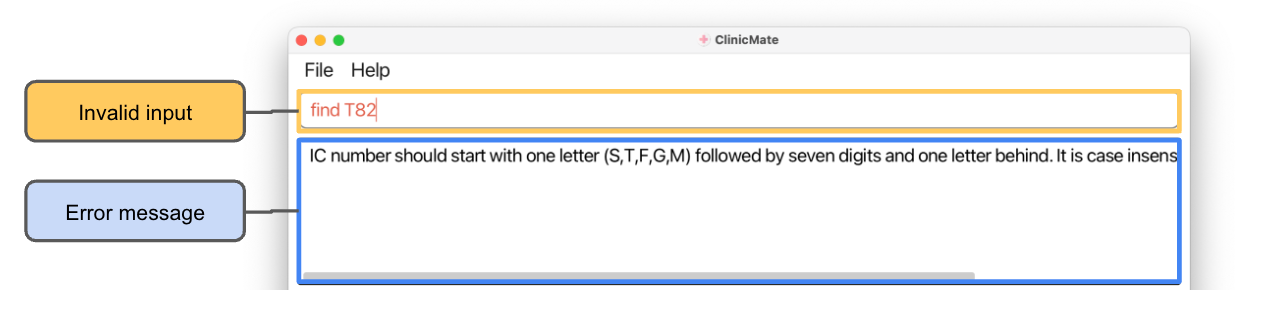
Possible Error that you might encounter:
There might be cases that the IC_NUMBER you keyed in is invalid as shown below. Do check if the IC_NUMBER is in the correct format.
↑ Back to Top ↑ Back to Table of Contents
Changing the displayed note: show
Need to view the notes of another patient by adjusting the display on the patient notes panel? Or perhaps you want to clear the current display altogether? Enter the show command for effortless management of note displays.
General Format: show [IC_NUMBER]
To change display
Format: show IC_NUMBER
Steps:
- Enter
show IC_NUMBERinto the command box as shown below.
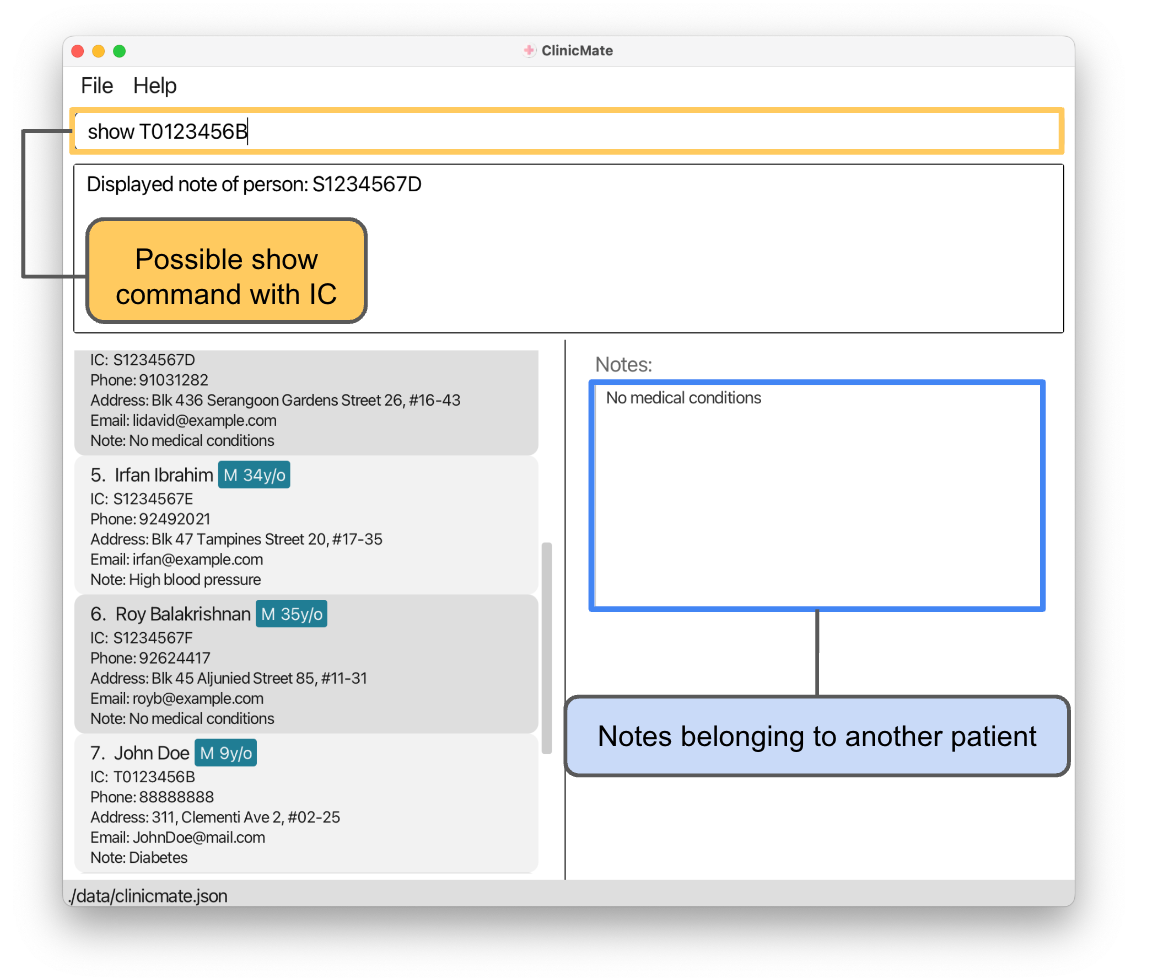
- Patient notes panel will be updated to the notes corresponding to the
IC_NUMBER.
edit Note:
- Rules for valid
IC_NUMBERfollows the parameter constraints here. - Displays the full note of the person with the specified
IC_NUMBERin the patient notes panel. - Does NOT modify the patient list panel.
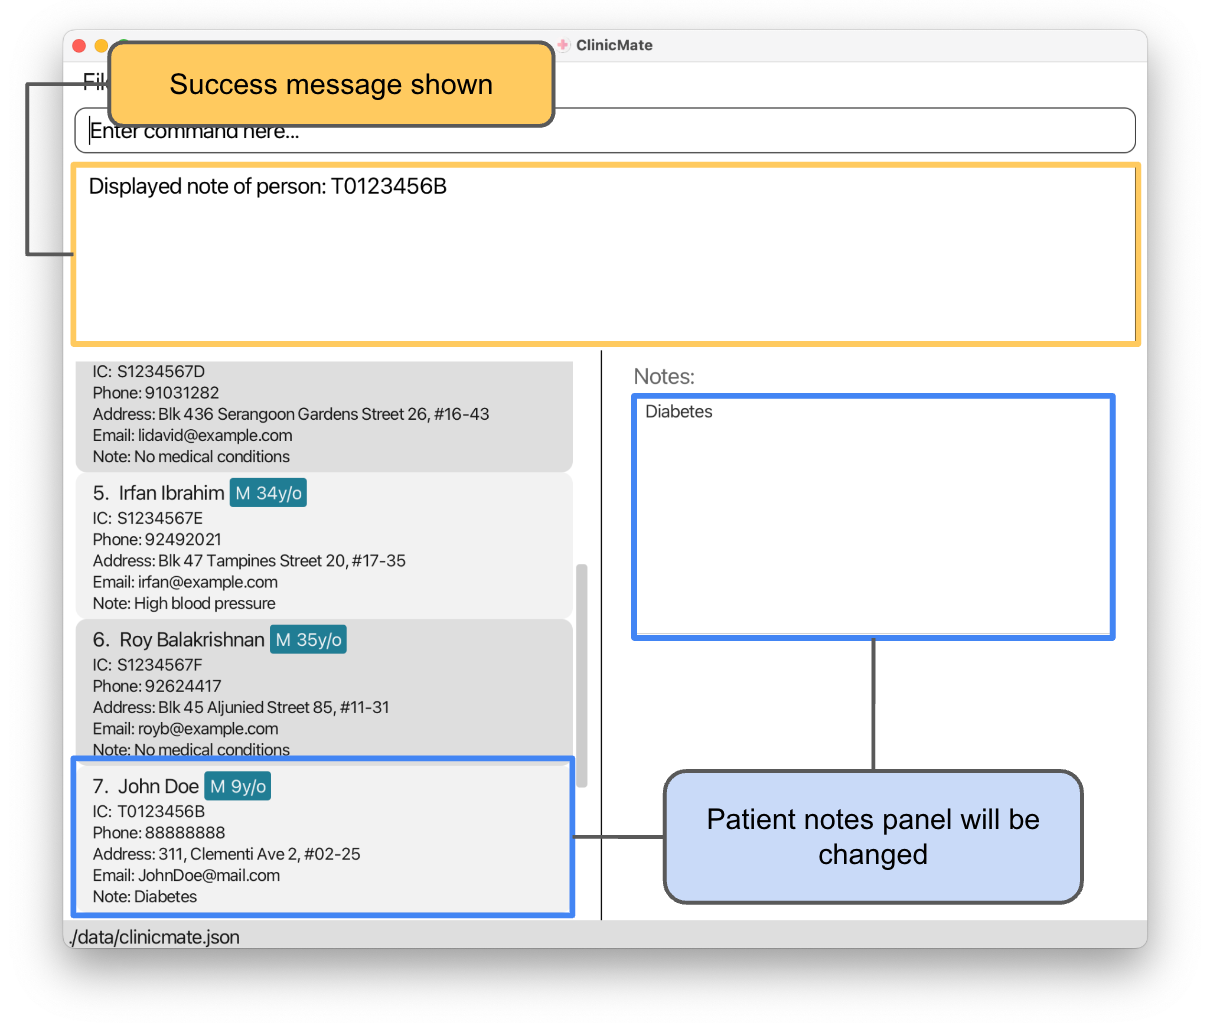
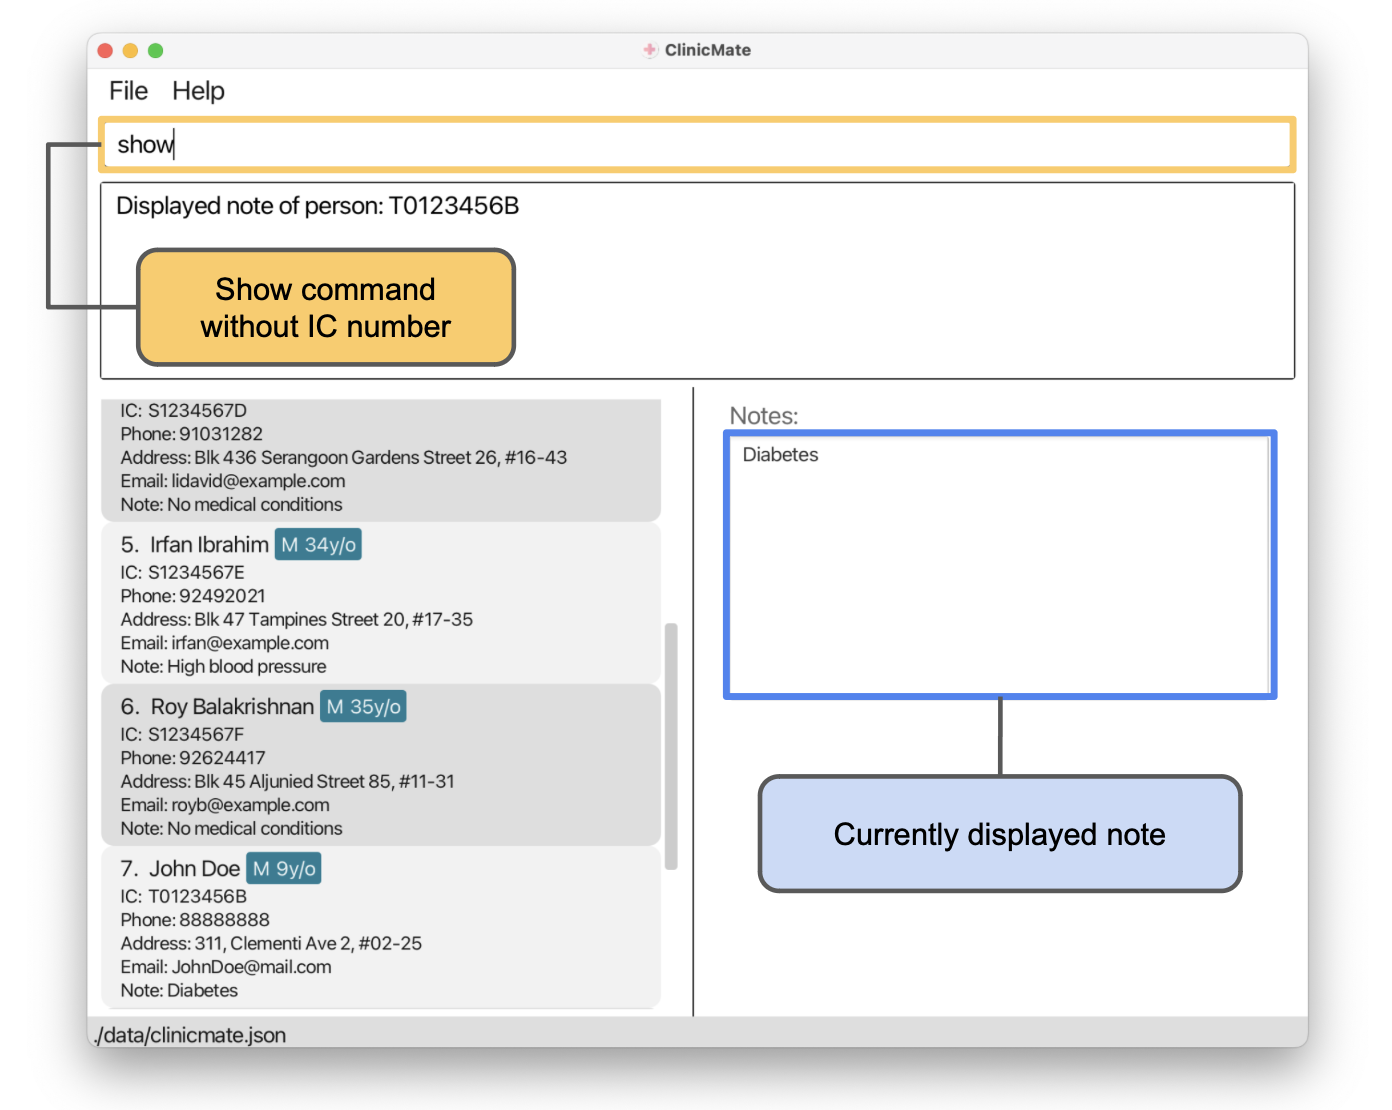
Example:
show T0123456Aupdates the patient notes panel to showJohn Doe's note.
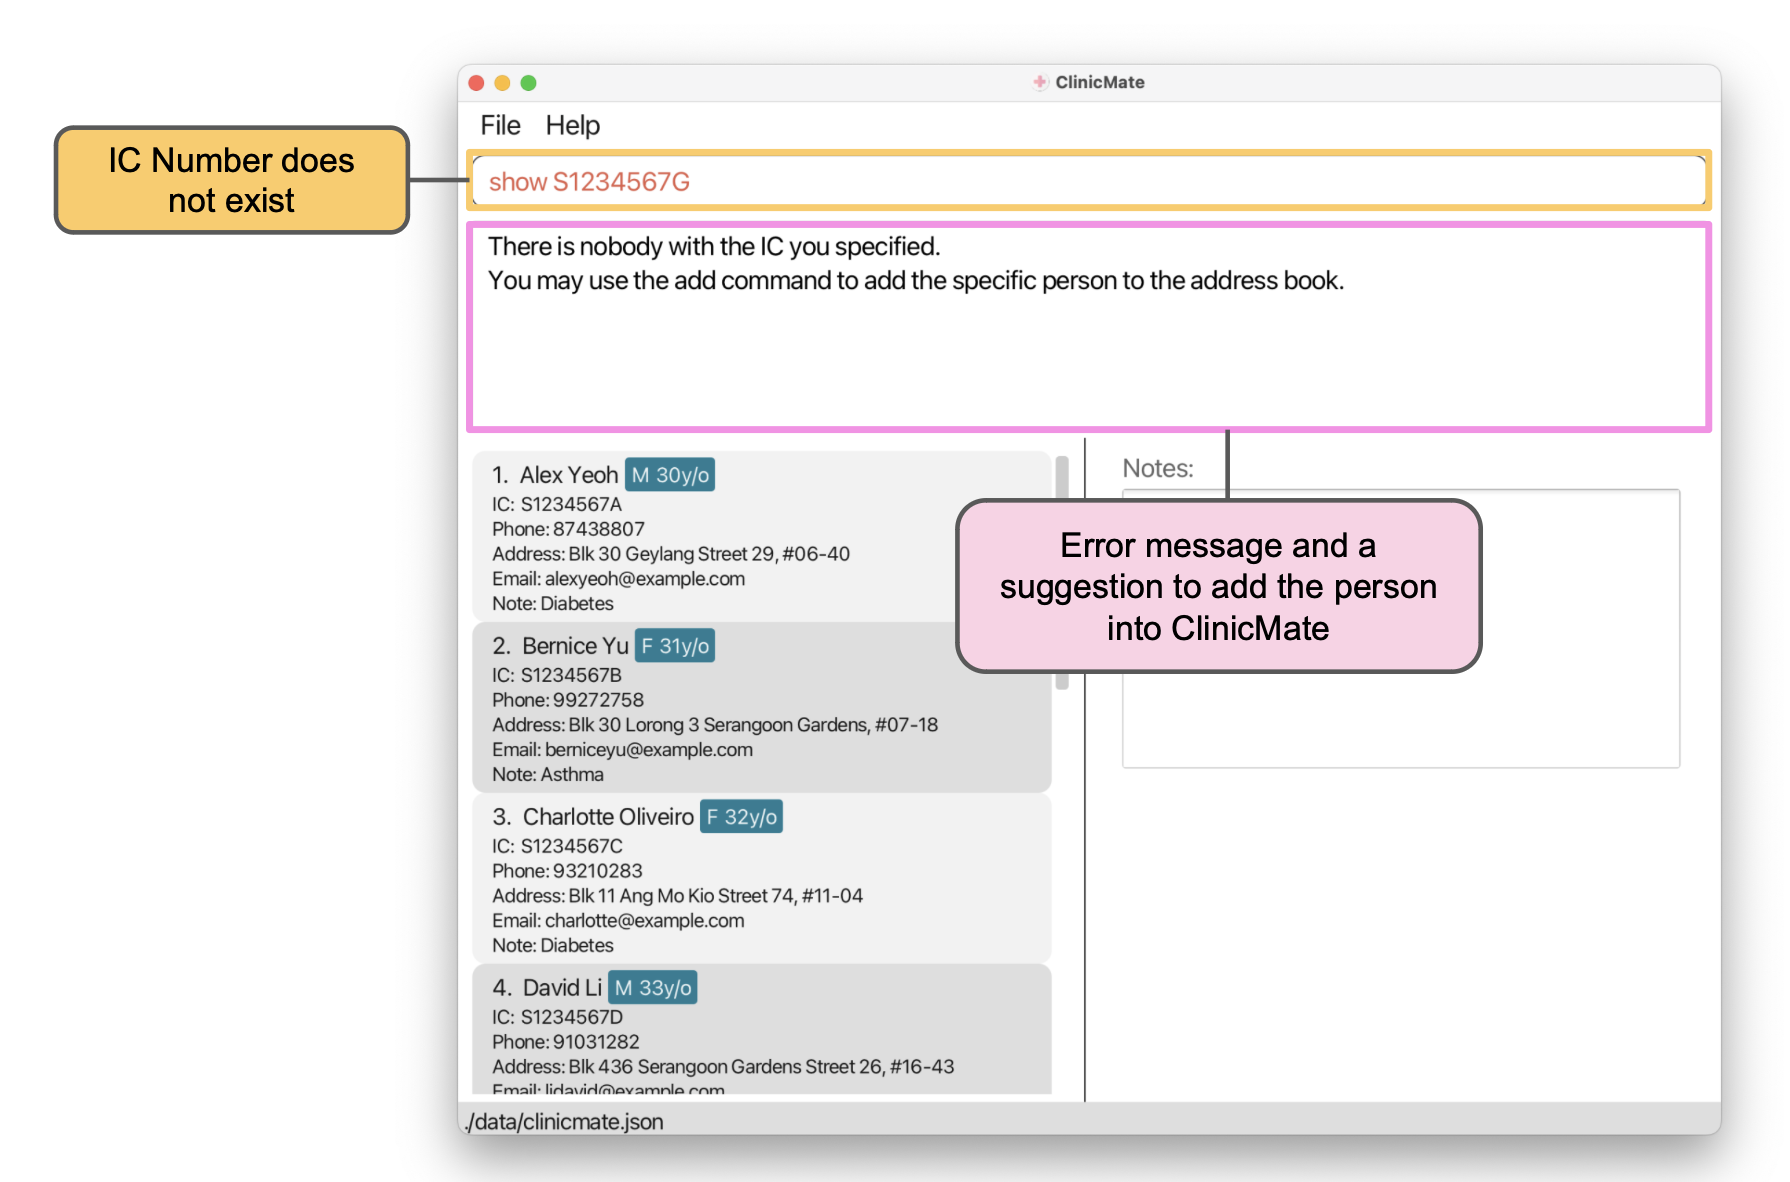
Possible Error that you might encounter:
There might be cases that the IC_NUMBER you keyed in does not exist in ClinicMate as shown below. Do check if the IC_NUMBER is registered before trying to show it.
Alternatively, you can add the patient into ClinicMate using our add command before doing a show.
To clear display
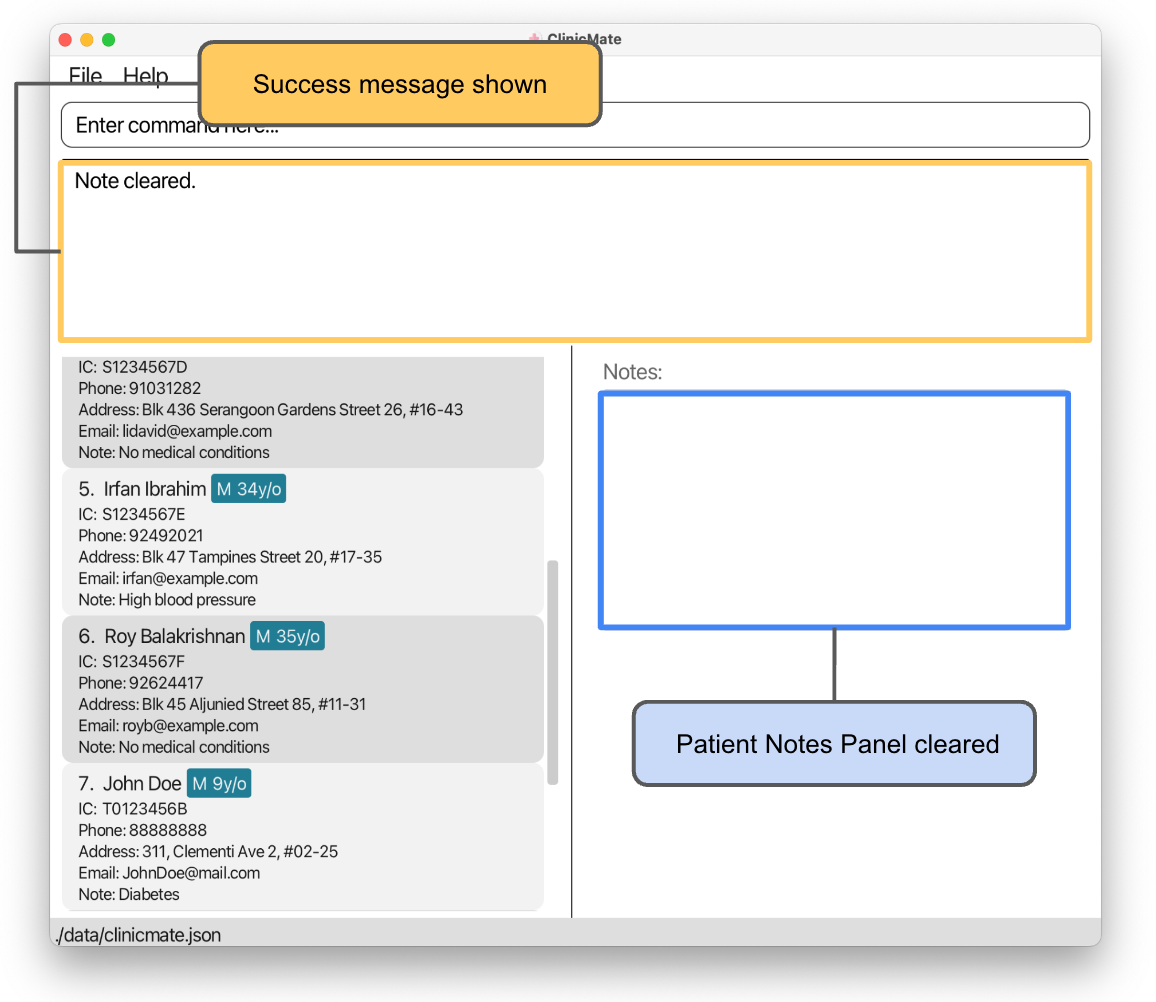
Format: show
Steps:
- Enter
showinto the command box as shown below.
- Patient notes panel will be cleared.
edit Note:
- Clears the patient notes panel.
- Does NOT modify the patient list panel.
Example:
showclears any note that was being displayed in the patient notes panel.
↑ Back to Top ↑ Back to Table of Contents
Editing a person : edit
Made a typo? Don't worry! The edit command is here to assist you in correcting any mistakes effortlessly using the patients' IC_NUMBER.
Format: edit IC_NUMBER [n\NAME] [p\PHONE] [e\EMAIL] [i\IC_NUMBER] [ag\AGE] [s\SEX] [a\ADDRESS]
lightbulb Useful Tip:
Remember that optional fields are indicated by square brackets []!
Steps:
- Enter
edit IC_NUMBER [n\NAME] [p\PHONE] [e\EMAIL] [i\IC_NUMBER] [ag\AGE] [s\SEX] [a\ADDRESS]into the command box. - The patient record with the corresponding
IC_NUMBERwill be edited.
edit Note:
- Edits the details of the person with the specified
IC_NUMBER. - The fields to be edited are indicated by the prefixes
n\,p\,e\,i\,ag\,s\,a\. - Only the fields that are provided will be updated.
- At least one field must be provided.
Examples:
edit T0123456A p\88888888edits the phone number of the person withIC_NUMBERofT0123456Ato88888888.
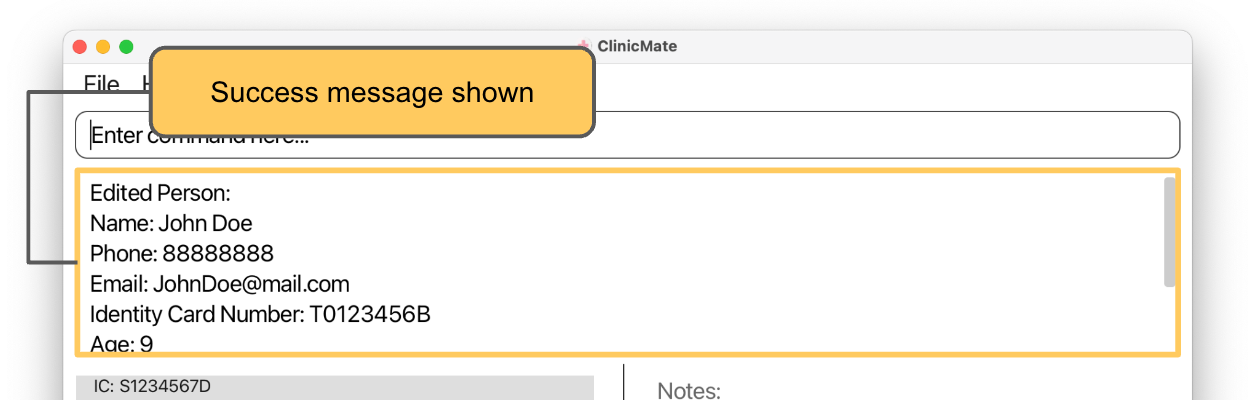
What a successful edit message looks like:
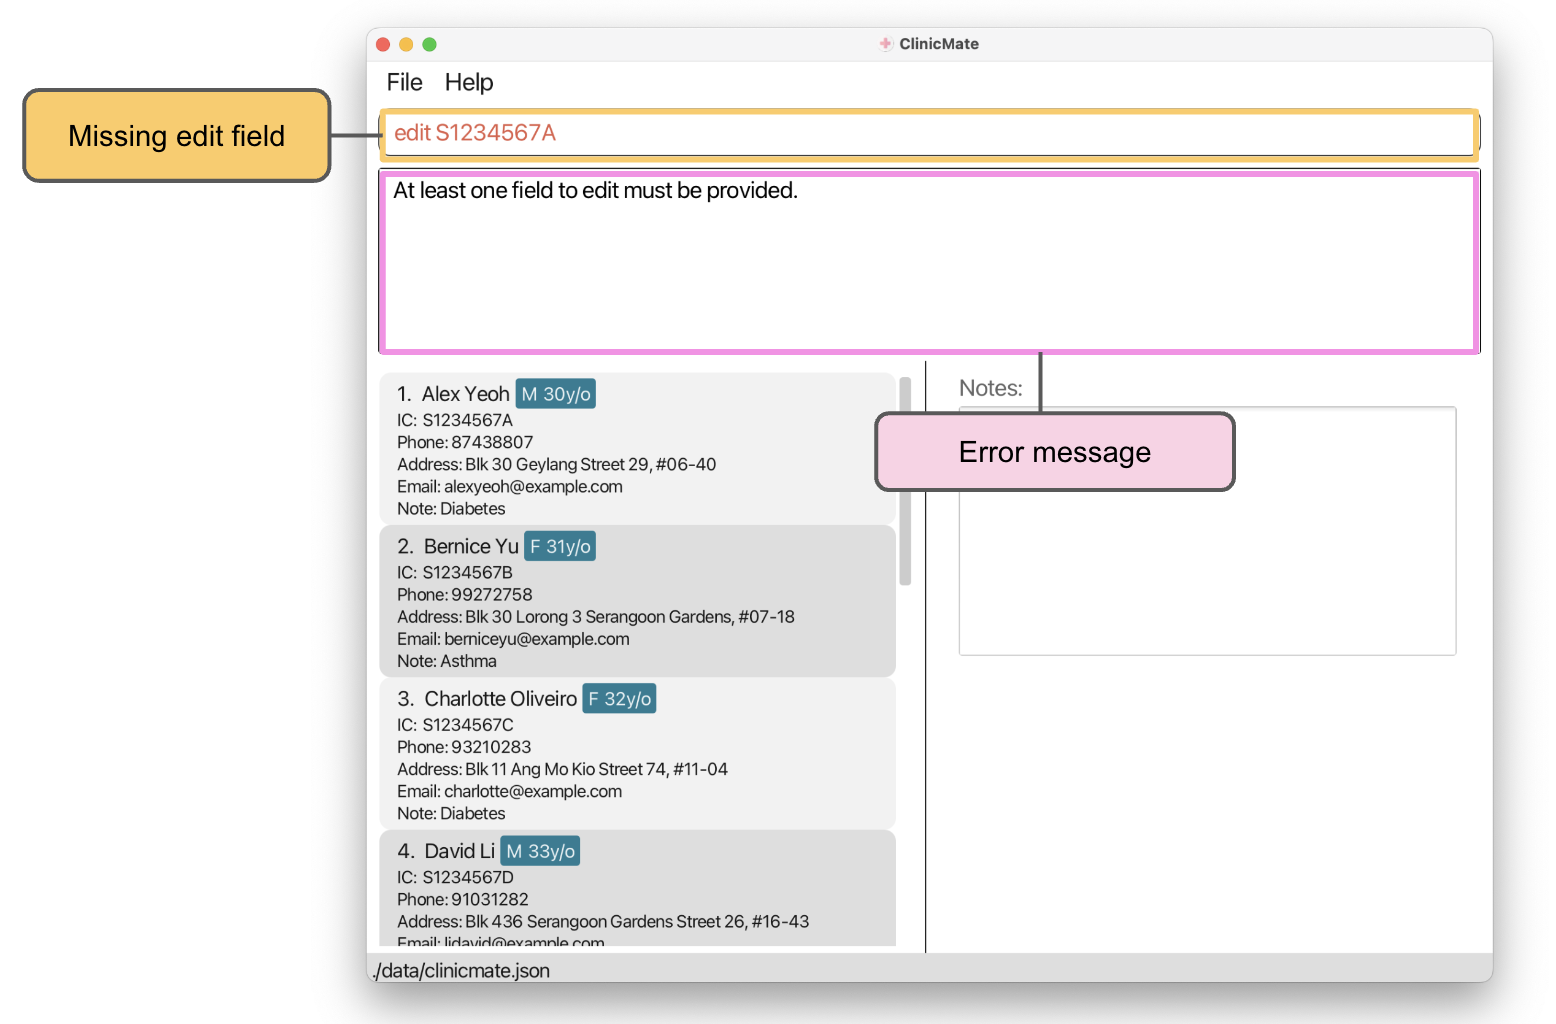
Possible Error that you might encounter:
At least one edit field is needed for this command! Do check if you have included a field in your input.
↑ Back to Top ↑ Back to Table of Contents
Deleting a person : delete
The delete command enables the removal of patient records from ClinicMate. Use it to efficiently manage patient data by removing outdated or unnecessary entries.
Format: delete IC_NUMBER
Steps:
- Enter
delete IC_NUMBERinto the command box. - The patient record with the corresponding
IC_NUMBERwill be deleted.
edit Note:
- Deletes the person with the specified
IC_NUMBER. - The
IC_NUMBERrefers to the IC number shown in the displayed patient list panel. - The
IC_NUMBERmust be the FULL IC NUMBER. - The search is case-insensitive. e.g
t0123456awill matchT0123456A. - Only the IC number is searched.
- Only full IC number will be matched e.g.
T0123456Awill not matchT0123A. - You can only delete one patient at any one time.
Examples:
delete T0123456AdeletesJohn Doewho has IC numberT0123456Afrom ClinicMate.
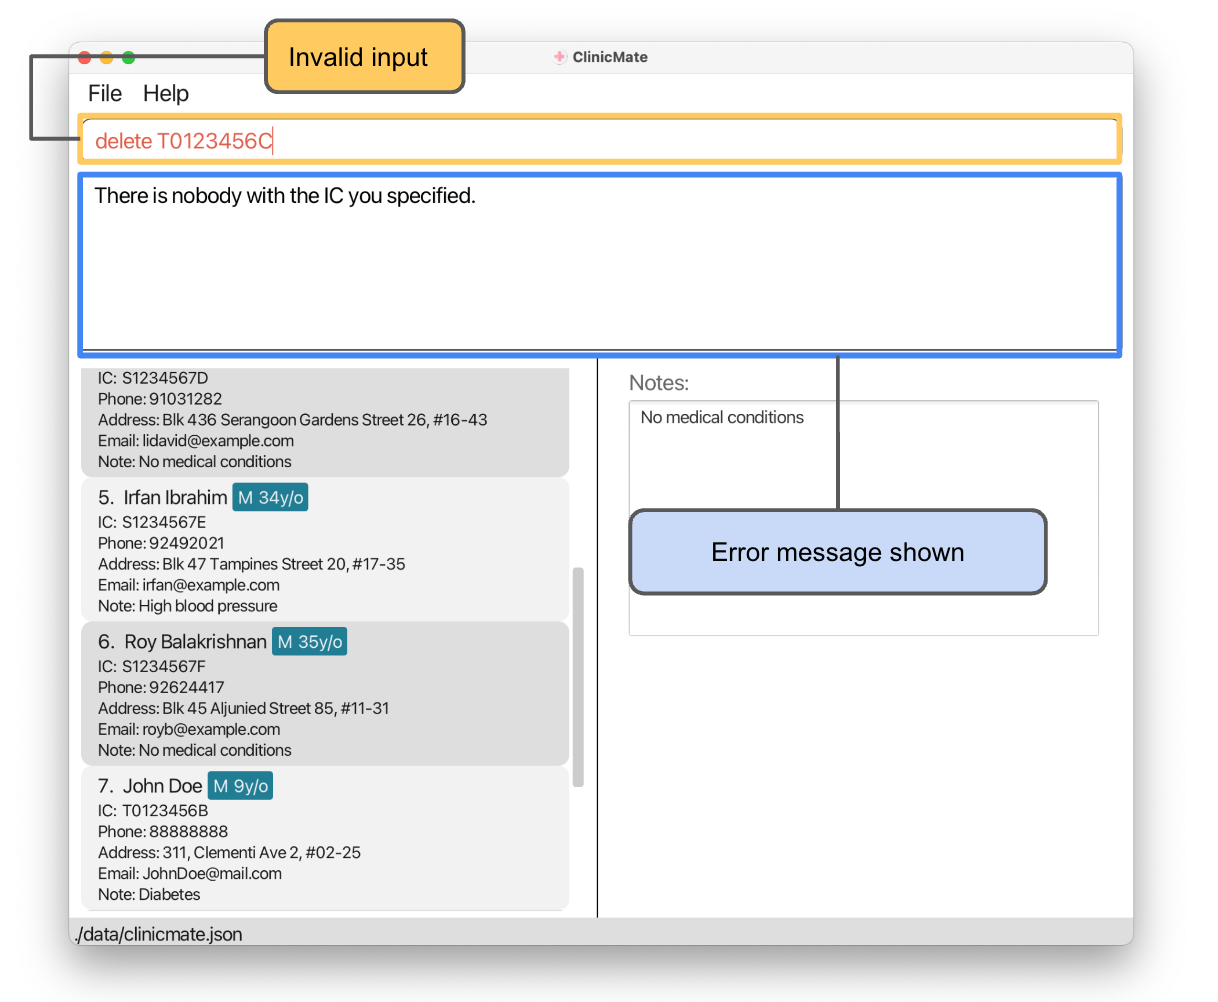
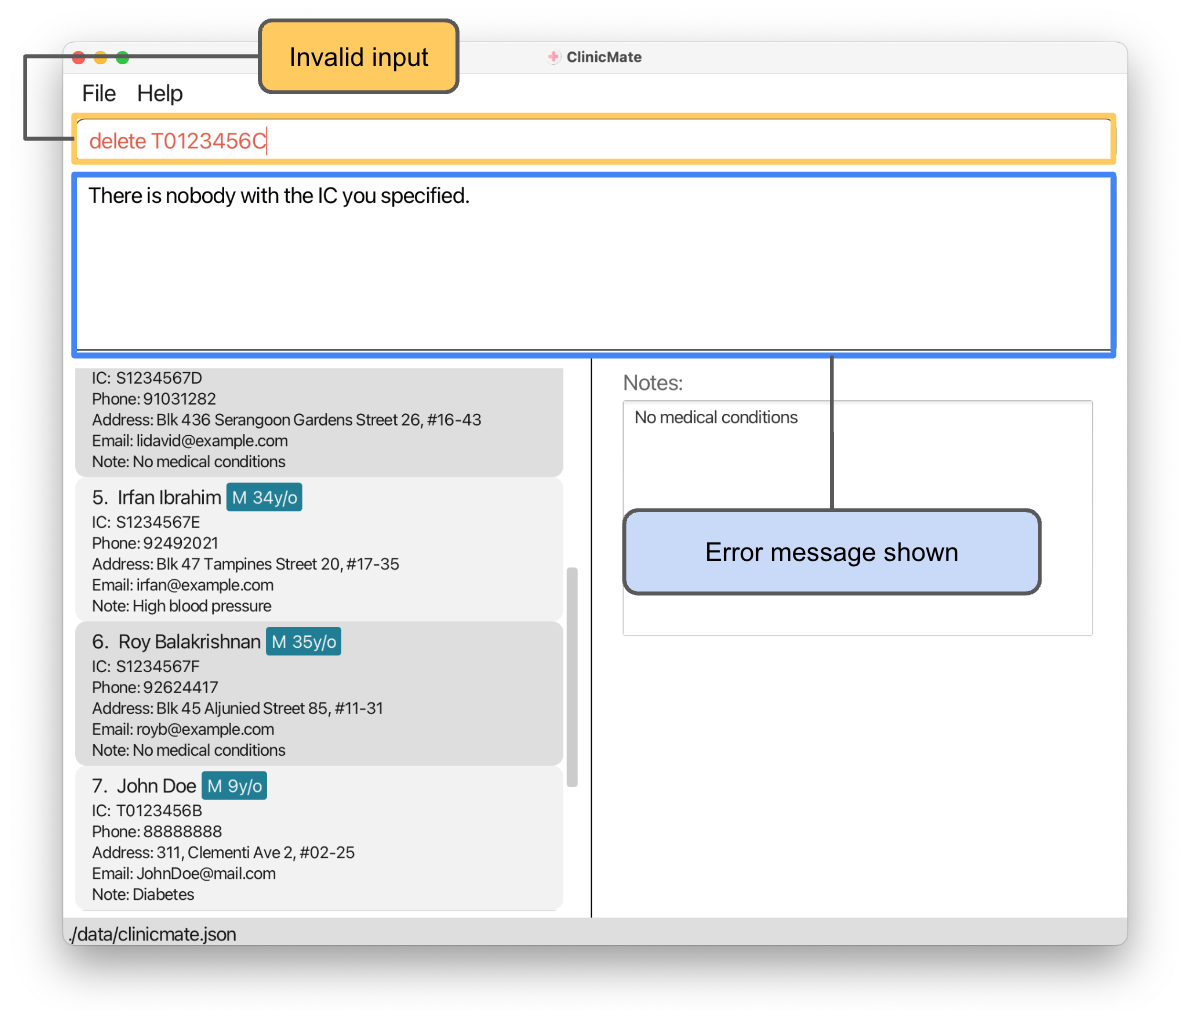
Possible Error that you might encounter:
There might be cases that the IC_NUMBER you keyed in does not exist in ClinicMate as shown below. Do check if the IC_NUMBER is registered before trying to delete it.
warning Warning:
IC_NUMBER tends to be long. Please make sure that the IC_NUMBER you want to delete is correct as we would not be able to recover lost patient information once deleted.
Note-Taking Function
This feature is tailored specifically for GPs, offering seamless note-taking capabilities to enhance efficiency and precision in history taking.
Adding a note : addnote
As GPs, it's essential to take accurate and detailed patient history. Simplify this process with the addnote command, ensuring efficient and accurate record-keeping.
General Format: addnote IC_NUMBER n\NOTE [-replace]
To append notes
Format: addnote IC_NUMBER n\NOTE
Steps:
- Enter
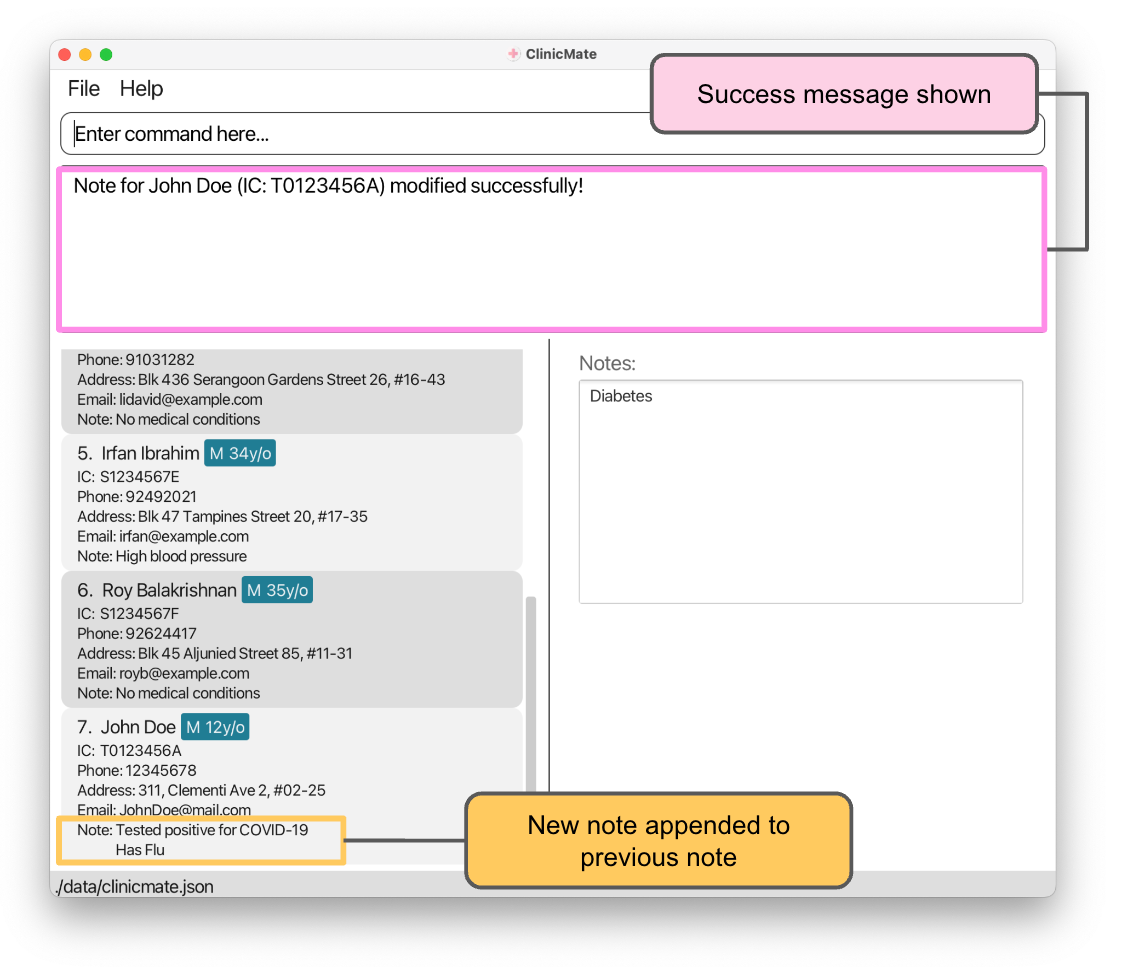
addnote IC_NUMBER n\NOTEinto the command box.
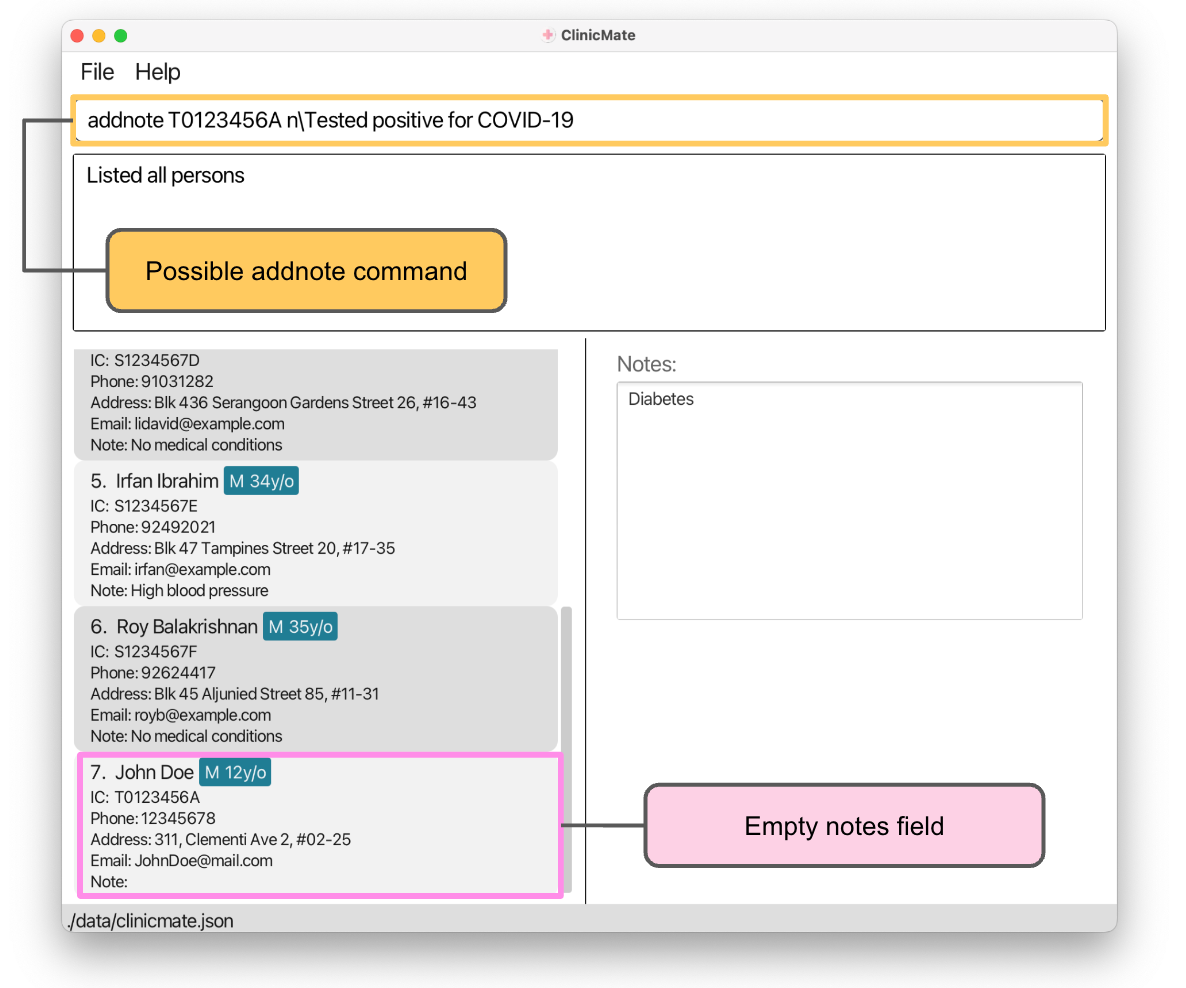
- A note will be added to the person with the specified
IC_NUMBER.
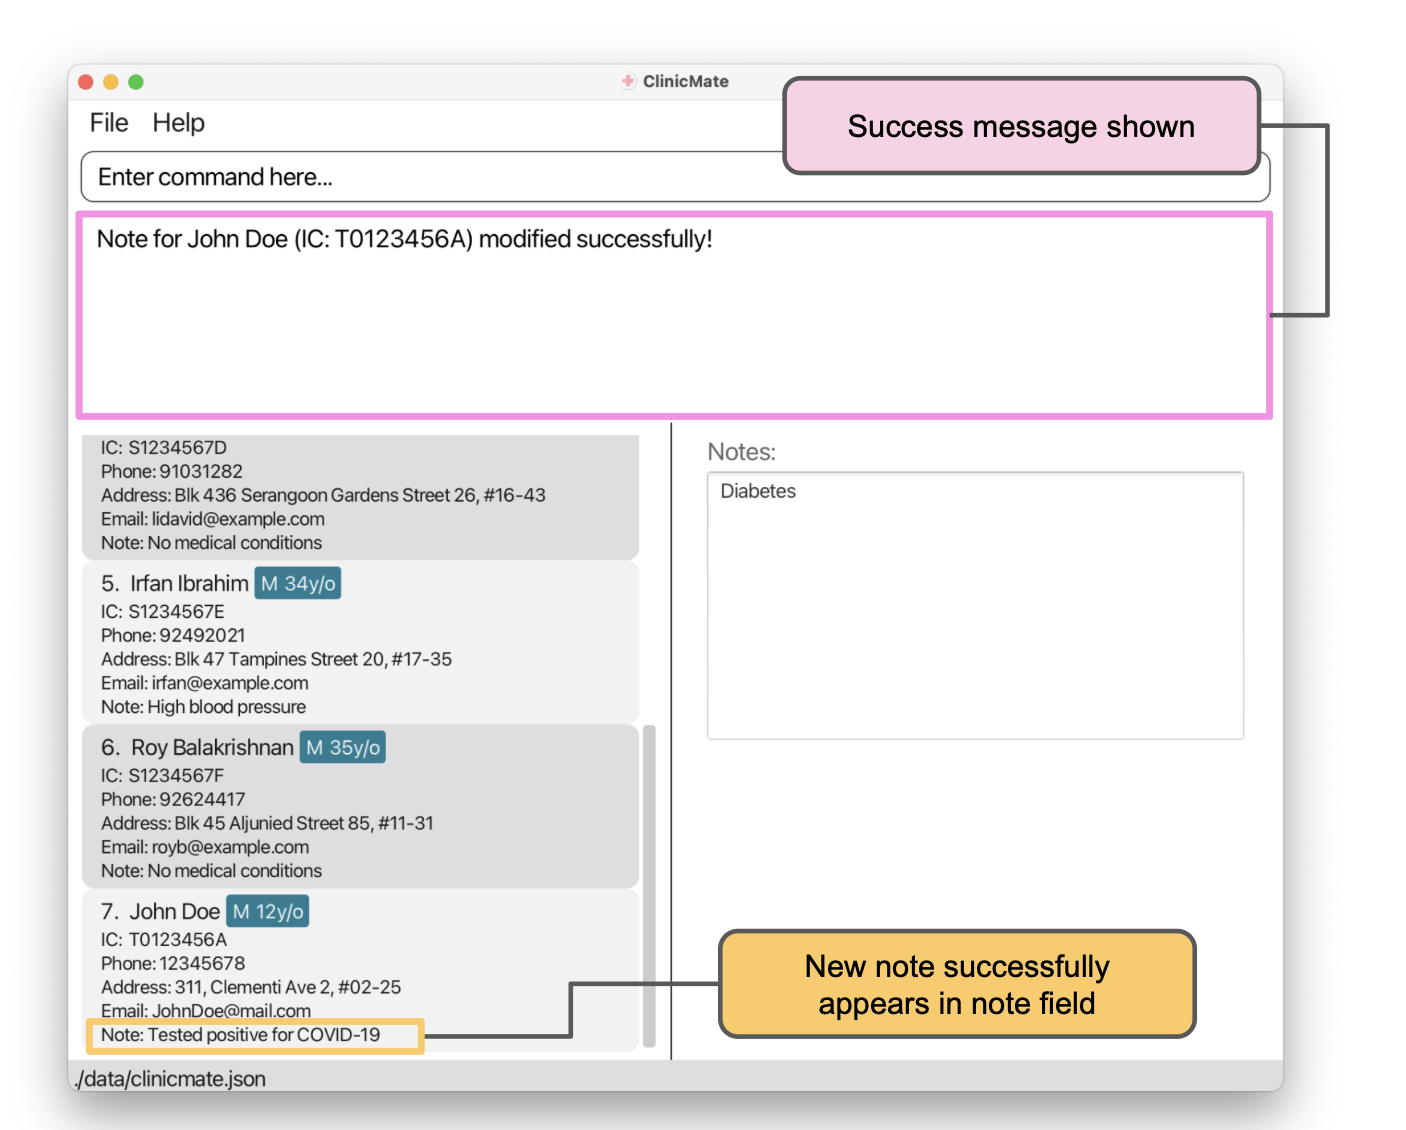
- New note will appear in the patient list panel. If notes already exist, the new note will be appended to the previous notes on a new line.
edit Note:
- The
IC_NUMBERrefers to the IC number shown in the displayed patient list panel. - The
IC_NUMBERmust be the FULL IC NUMBER. - IC number must be valid and currently exist in the database.
- When adding notes, the new note added will be appended to the current note of the person. i.e. current note is preserved.
To replace notes
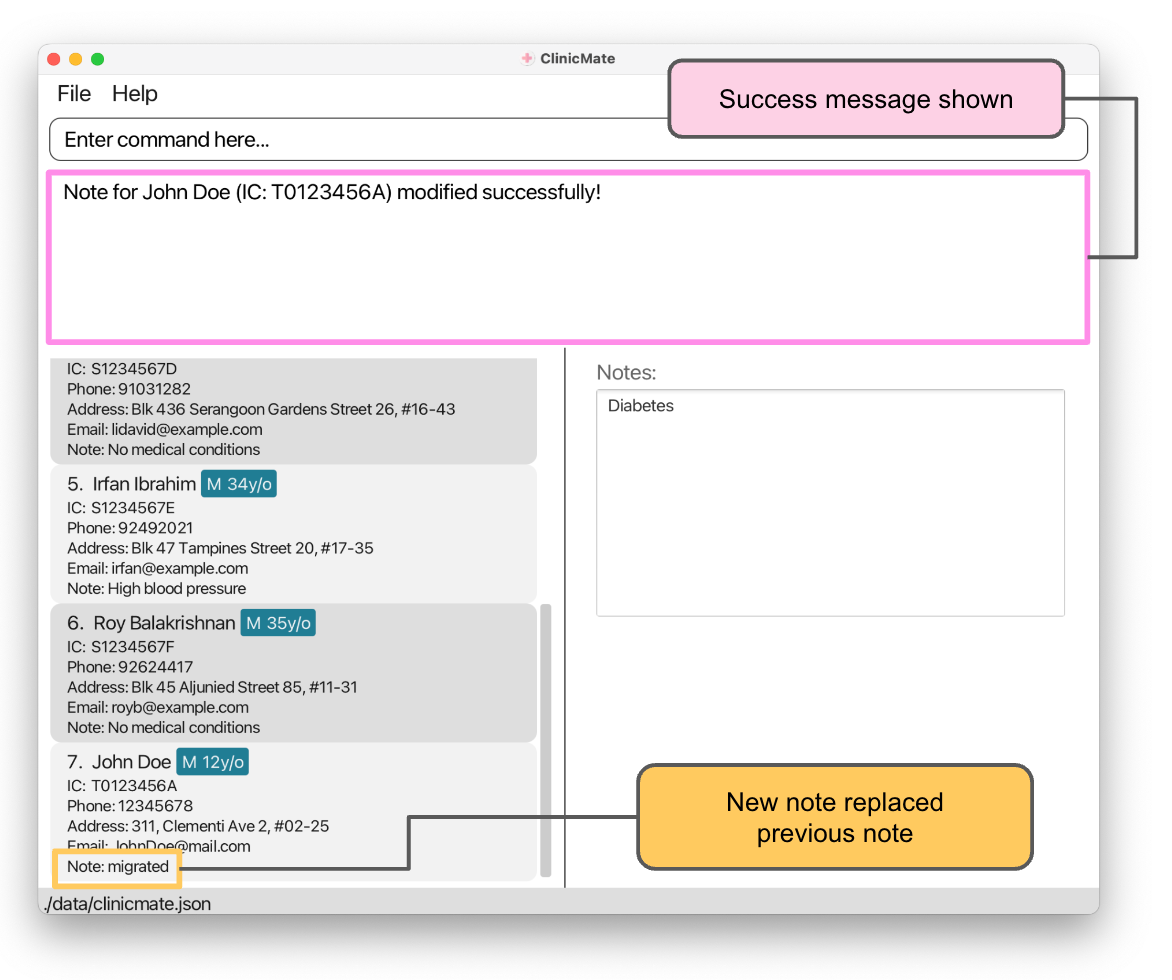
Format: addnote IC_NUMBER n\NOTE -replace
Steps:
- Enter
addnote IC_NUMBER n\NOTE -replaceinto the command box.
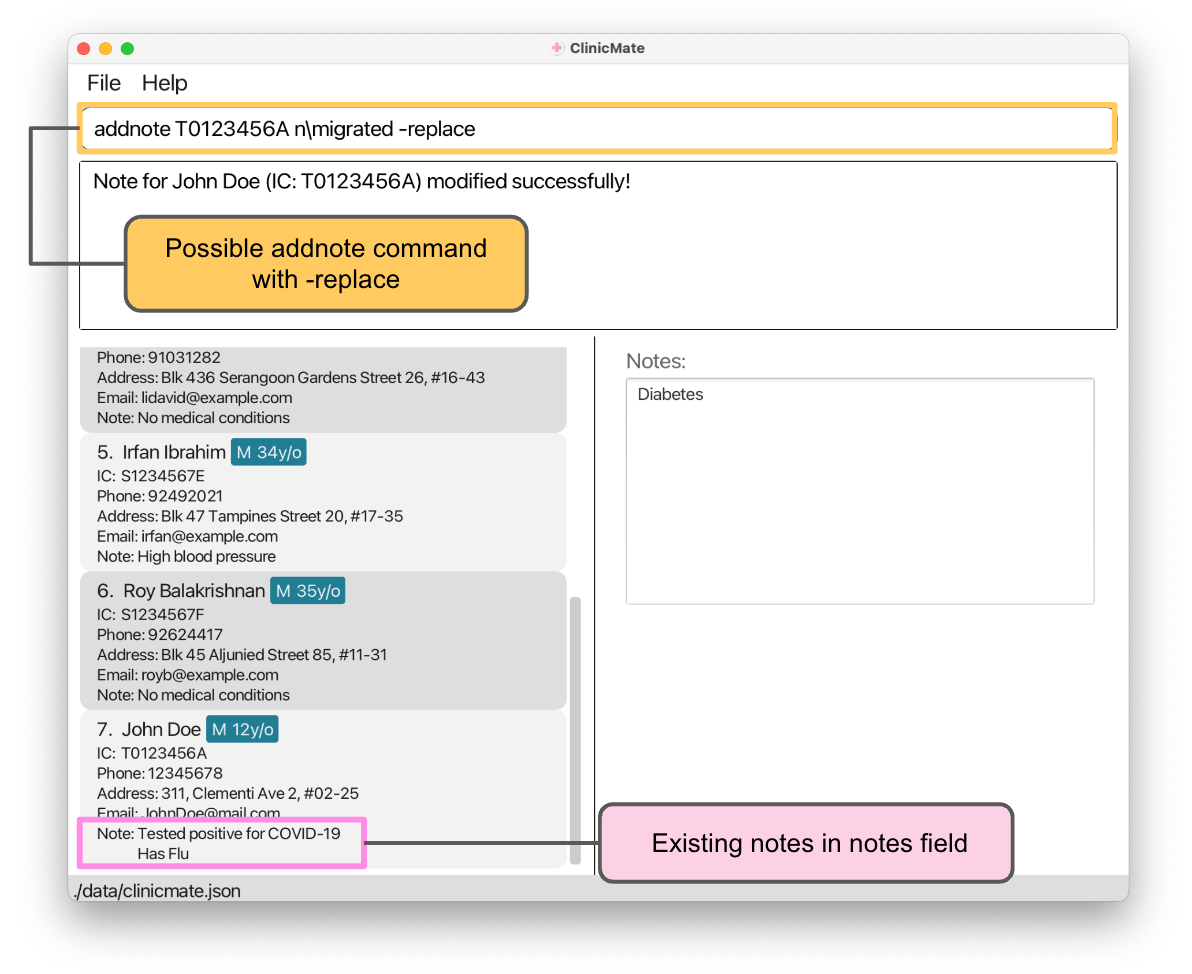
- The note of the person with the specified
IC_NUMBERwill be replaced with the new note.
edit Note:
- The
IC_NUMBERrefers to the IC number shown in the displayed patient list panel. - The
IC_NUMBERmust be the FULL IC NUMBER. - IC number must be valid and currently exist in the database.
- Notes will not wrap around. Notes added with separate uses of the
addnotecommand will appear as separate lines. - The
-replaceflag is used to replace the current note with the new note.- It must only be used once.
- It must only be used at the end of the command.
- Anything after the
-replaceflag will be ignored. For example,-replacefdsharehwill be interpreted as-replace.
Examples:
addnote T0123456A n\Patient has diabetesadds a notePatient has diabetesto the person with the IC numberT0123456Ain ClinicMate.addnote T0123456A n\Patient has diabetes -replacereplaces the note of the person with the IC numberT0123456AtoPatient has diabetes.
⚠️ Warning:
- In the current version of the app, having more than one
n\in the command might cause undefined behaviour. Please avoid havingn\in the note body.
lightbulb Useful Tip:
Users will be able to see specific patient notes on the patient notes panel using the
showcommand. (See show command)An alternative to check if the note is updated correctly, use the
findcommand. (See find command) On the patient list panel, the list will be filtered to that specific patient; On the patient notes panel, the updated notes of the specific patient will be shown.If you'd like to add empty line(s), you can add an empty note (i.e.
addnote T0123456A n\1 or more times. Do note that the patient list panel will not display the empty line(s) unless there is a note with other characters before and after the note with just spaces.The space characters at the start and end of the note are stripped during the execution of this command. So
addnote T0123456A n\ Diabetesandaddnote T0123456A n\Diabetesgive the same note ofDiabetes.
↑ Back to Top ↑ Back to Table of Contents
Data Files
Saving the data
ClinicMate data is saved in the hard disk automatically after any command that changes the data. There is no need to save manually.
Editing the data file
ClinicMate data is saved automatically as a JSON file [JAR file location]/data/clinicmate.json. Advanced users are welcome to update data directly by editing that data file.
⚠️ Warning:
- If your changes to the data file makes its format invalid, ClinicMate will discard all data and start with an empty data file at the next run. Hence, it is recommended to make a backup of the file before editing it.
- Furthermore, certain edits can cause ClinicMate to behave in unexpected ways (e.g. if a value entered is outside the acceptable range). Therefore, edit the data file only if you are confident that you can update it correctly.
↑ Back to Top ↑ Back to Table of Contents
FAQ
Q: How do I open my terminal?
A: Here are the instructions to open your terminal for the different types of operating systems:
- Windows: Click on the Windows Start button, and type 'Command Prompt' or 'cmd' into the search bar. Press Enter to open it.
- macOS: Click on 'F4' and type 'terminal'. Press Enter when 'terminal' appears in the search results.
- Linux: Press 'Ctrl', 'Alt' and 'T' simultaneously to open the terminal.
Q: When will the patient notes panel be cleared?
A: The patient notes panel will be cleared when you use the show command without any IC_NUMBER. Unfortunately, clear or delete command will not clear the patient notes panel.
Q: When using multiple screens, moving the application to a secondary screen and later switching to using only the primary screen, the GUI opens off-screen. What do I do?
A: Delete the preferences.json file created by the application before running the application again.
Q: Is there a limit to the number of patient records ClinicMate can manage?
A: ClinicMate is designed to handle a large number of patient records efficiently. However, performance may vary depending on the hardware specifications of your computer and the amount of data being managed.
Q: How do I load my data from another computer?
A: Let's say that you want to move your data from computer A to computer B. You should:
- Delete the
clinicmate.jsonfile that is located at[JAR file location]/data/clinicmate.jsonin computer B. - Copy the
clinicmate.jsonfile from computer A to computer B at the same location as above. - Run the ClinicMate in computer B to load the data.
Q: Can I export patient data from ClinicMate for reporting or backup purposes?
A: Currently, ClinicMate does not support direct export of patient data. However, you can manually copy the data from the data file located at [JAR file location]/data/clinicmate.json for backup or reporting purposes.
Q: Can I customize the fields for patient records in ClinicMate?
A: ClinicMate currently supports predefined fields for patient records (name, phone, email, IC number, age, sex, address). Customization of fields is not supported in the current version.
Q: How secure is the patient data stored in ClinicMate?
A: ClinicMate stores patient data locally on your computer in a JSON file. It is recommended to keep your computer secure and up-to-date with the latest security patches to ensure the safety of patient data.
Q: Is there a way to import patient data into ClinicMate from other software?
A: ClinicMate does not currently support direct import of patient data from other software. However, you can manually enter patient data using the add command.
Q: I am not able to directly access the user guide by pressing on the icon in the help window.
A: Linux users might face some difficulties when trying to directly access the website. Unfortunately, we currently do not have a solution for this. Please access our user guide in the alternative way, which is to copy the URL and pasting it in your web browser.
Q: The patient notes panel does not display the most updated contact I interacted with.
A: Currently, only the find or show command will change whose notes are displayed in the patient notes panel.
Q: The patient notes panel is not showing the full note. Can I expand the display?
A: ClinicMate does not currently support expanding the patient notes panel. However, you can scroll through the notes both vertically and horizontally using the scrollbar provided.
Q: Some of my patient information is being truncated in the patient list panel. How can I view the full information?
A: Unfortunately, ClinicMate displays patient information in a fixed format, including sections such as email and note, that might cause long entries to be truncated (e.g. An excessively long name would cause the name, age and gender to be truncated). This will be fixed in a future release.
Q: Long lines of notes in the patient list panel are being unevenly truncated. Is this normal?
A: Yes, this is a known issue. You can still view the full note using the show command through the patient notes panel.
Q: Can I use addnote repeatedly with the same message?
A: Yes! ClinicMate does not restrict the number of times you can use the addnote command with the same message.
Q: Do you support non-English inputs?
A: We do not have dedicated support for non-English inputs, and some features might not work as expected. We recommend using English inputs for the best experience.
↑ Back to Top ↑ Back to Table of Contents
Coming Soon
- Support for multiple phone numbers: Allow users to add multiple phone numbers for a single patient record.
- Date of Birth: Add a field for date of birth to patient records for better age calculation.
- Appointment scheduling: Implement a feature to track and schedule patient appointments.
- Support for patient identification: Allow users to use other methods to identify patients, such as passport numbers, names or driving license numbers.
↑ Back to Top ↑ Back to Table of Contents
Glossary
Definitions of Key Terms
These descriptions will help you understand the key terms used in ClinicMate.
| Term | Definition |
|---|---|
| Alphanumeric | Alphanumeric pertains to a character set containing both letters and numbers, encompassing the full range of 26 English alphabet letters (both uppercase and lowercase) along with numerical digits 0 through 9. |
| Case-insensitive | Case-insensitive treatment equates uppercase and lowercase characters, treating them as identical. For instance, both john and John would be considered the same. |
| CLI | CLI, or Command-Line Interface, is a text-based interface enabling users to interact with software via typed commands. |
| Command | A command denotes a user's directive to ClinicMate, instructing it to execute a specific action. For example, the add command adds the patient's details to ClinicMate. |
| GUI | GUI, or Graphical User Interface, facilitates user interaction with software through visual elements like icons, buttons, and windows, providing a more intuitive alternative to text-based commands. |
| JAR | JAR, short for Java Archive, represents a package file format used to bundle multiple Java class files, along with associated metadata and resources, into a single file for distribution purposes. |
| JSON | JSON, standing for JavaScript Object Notation, serves as a lightweight data interchange format that is human-readable and easy for machines to parse, commonly utilized in web applications and configuration files. |
| Parameter | A parameter resembles a field in a form that requires input. In the command edit S1234567A ag\AGE n\NAME, AGE and NAME are parameters within the command. |
| Prefix | A prefix acts as a keyword used to identify a parameter. In the command edit S1234567A ag\AGE n\NAME, ag\ and n\ function as prefixes. |
Parameters Description
| Parameter | Description | Constraints |
|---|---|---|
NAME | Name of the patient. | Only contain alphanumeric characters and spaces, and should not be blank. |
PHONE | Phone number of the patient. | Only contain numbers, be at least 3 digits. Should not be blank. |
EMAIL | Email of the patient. | Should be in the format of local-part@domain and should not be blank. |
IC_NUMBER | IC number of the patient. | Case-insensitive and should not be blank. It should start with one letter (S, F, G or M), followed by 7 digits and 1 letter behind. |
AGE | Age of the patient. | Only contain numbers, and should not be blank. |
SEX | Sex of the patient. | Case-insensitive and should not be blank. Only accepts m, f, M, F as inputs. |
ADDRESS | Address of the patient. | Case-insensitive and should not be blank. |
NOTE | Note of the patient | Case-insensitive and can be blank. |
edit Note:
- Constraints are designed to be less restrictive to accommodate to a wide range of user inputs.
- Instances include having names with special characters.
lightbulb Useful Tip:
- If you enter an invalid input for any of the prefixes, you will see an error message in the command box.
Refer to the error message, check the description for the respective prefix and try the command again! An example of an error message is shown below.
Email Format Description
The email format is local-part@domain.
local-part constraints:
- Only contain alphanumeric characters and these special characters, excluding the parentheses, (+_.-).
- May not start or end with any special characters.
domain name constraints:
- Made up of domain labels separated by periods.
- End with a domain label at least 2 characters long.
- Have each domain label start and end with alphanumeric characters.
- Have each domain label consist of alphanumeric characters, separated only by hyphens, if any.
↑ Back to Top ↑ Back to Table of Contents
Command summary
| Action | Format, Examples |
|---|---|
| Add | add n\NAME p\PHONE e\EMAIL i\IC_NUMBER ag\AGE s\SEX a\ADDRESS e.g. add n\John Doe p\88888888 e\johndoe@mail.com i\T0123456A ag\12 s\M a\John street, block 123, #01-01 |
| Clear | clear |
| Delete | delete IC_NUMBERe.g. delete T0123456A |
| Edit | edit IC_NUMBER [n\NAME] [p\PHONE] [e\EMAIL] [i\IC_NUMBER] [ag\AGE] [s\SEX] [a\ADDRESS]e.g. edit T0123456A p\88888888 |
| Add Note | addnote IC_NUMBER n\NOTE [-replace]e.g., addnote T0123456A n\Patient has diabetese.g. addnote T0123456A n\Patient has diabetes -replace |
| Find | find IC_NUMBERe.g. find T0123456A |
| Show | show [IC_NUMBER]e.g. show T0123456A e.g. show |
| Help | help |
| List | list |
| Exit | exit |